
A fresh coat of paint can make a room look updated and inviting, but rolling the paint onto a room’s walls is only part of the task. Other work has to be done along the edges of a room to make the work look clean, and only a few tricks of the trade make it happen. Here’s how to paint ceiling edges.
Whether you’re just doing a single room or giving your whole house a new look with paint, these tips, plus a few key tools, will help you do edge work that is quick and easy. Use the right technique, and touch-ups will be a thing of the past, and your final result will look professional. If you’re not interested in doing it yourself but want your home to look perfect, SD Custom Painting also provides professional interior painting and edging services.
Table of Contents
Toggle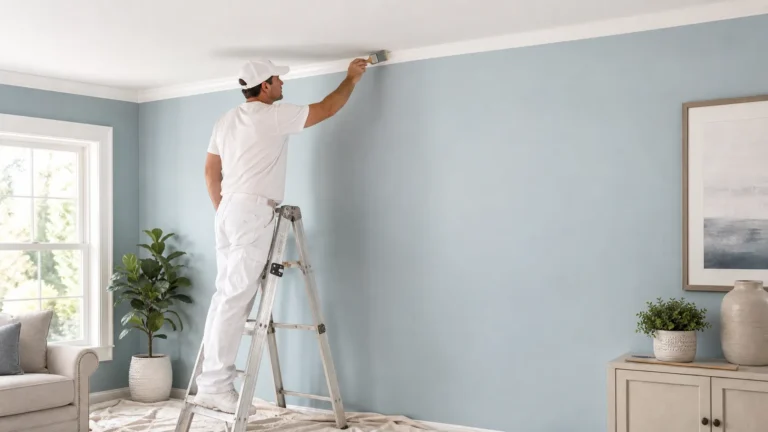
Why Painting Ceiling Edges Requires Extra Care
You notice it when you enter the room, right? It’s practically like a spotlight on the ceiling-to-wall intersection. If you paint a contrasting color on the walls and ceilings, a small bump will be eye-catching. And that eye-catching uneven brushstroke, or roller bump, will make it seem like there’s a waviness to that border from across the room.
The fact of the matter is, it’s not easy to paint ceiling edges. They are close to your head, and standing on a ladder or scaffold means overextending your arms to get the job done. You find it difficult to keep the pressure on your brush consistent. Now, if you want your ceiling edges done right, it’s about more than just loading a brush with paint.
Prepare the Room Before You Start
Ready to speed up and clean up your painting project? Be prepared. Move all furniture away from the wall or cover it with plastic. Get a drop cloth on the floor. It’s better to do this before you start painting than after.
Note the corners of the ceiling and wall. Wipe away any dust, cobwebs, dead debris, or similar with a clean cloth. Can you find any cracks or holes?
- Repair them first and paint afterward.
- Add a filler if needed, then sand smooth once dry.
Protect the Surfaces Around the Ceiling
Think you’re a little over-dousing the ceiling or wall? Grab some painter’s tape. Stick the tape along the top of the wall/ceiling, pressed straight down against the surface to keep the paint from leaking underneath.
But a quick question: Do you really need tape? Professional painters do fancy brushwork that eliminates the need for tape. And if you’re not careful when you remove it, tape can actually leave a mess. Do you use tape?
Choose the Right Brush for Ceiling Edges
Ever had trouble reaching those ceiling corners? Well, you’re not the only one. Selecting the proper paintbrush can be more critical than what color you choose. You need a good angled sash brush to reach the corners, and a good-quality angled sash paintbrush that is around 2 to 2.5 inches wide can really help you work nicely on the edges without making a mess!
Now, as you consider which is the best paintbrush for edging, focus on the bristles. You’re looking for stiff ones, but not so stiff that they don’t have some give. You also want bristles that retain some paint, but not so much that you need to reload constantly. A really large brush can be hard to control, whereas a small brush may require too many strokes.
How to Paint Edges of a Ceiling Step By Step
You’ve set up the room, gathered your supplies. Now what? You’ll want to go around the perimeter, trying to keep your paint coat consistent and stopping any thick drips or spills that would run past your intended surface.
Begin by loading only the tip of the brush. Dunk only the end of the bristles and brush it against the side of the container to knock off excess. A giant load of paint on the brush is your enemy: Excess is a recipe for dripping and accidental mishaps.
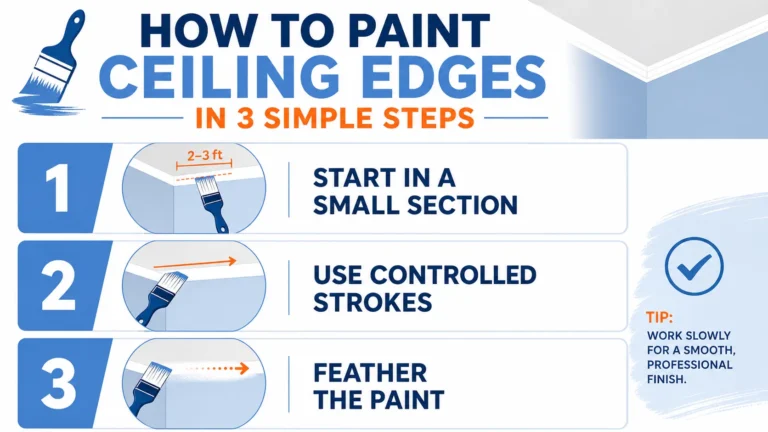
1. Start in a Small Section
Here’s the thing: be careful not to take the entire room at once. Choose a small section of the ceiling edge that is manageable for you, roughly two to three feet. This will give you a good surface to control so you can maintain a wet edge.
Hold your brush so the angled tip is close to the corner. Give it a wiggle and move it lightly and evenly along the edge of the wall. If you press down too hard, you’ll spread the paint and create a rat’s nest of false brushstrokes that you’ll never be able to straighten out.
2. Work With Controlled Brush Strokes
Why go over the same spot multiple times when you can go over it in longer, even strokes? Start a little away from the edge and move the paint toward the edge. This will give you better control of how far the paint goes.
And what if your brush feels dry? Instead of forcing it against the surface, reapply with a fresh load of paint. This will help you achieve a uniform result and avoid overworking your canvas.
3. Feather the Paint Away From the Edge
After you’ve got that line just right, go ahead and lightly feather the paint away from the corner. This will feather the brushed paint out into the rest of the ceiling or wall and minimize brush marks.
Another helpful hint: try not to go over paint that’s begun drying, as it will “drag” the existing paint and spoil the smooth finish. Concentrate on painting small sections at a time while the paint is still wet. Why not try this technique? Happy ceiling edging!
What Is the Best Way to Paint Edges?
Have you asked yourself what the secret is to painting crisp edges? It depends on your surface prep, paint selection, and skill level. For interiors, a good angled brush and proper prep work can make a huge difference. Brush the edges first, then roll over the paint when you’re ready to cover the large area.
The trick is: hold your brush at a uniform distance from the corner and make a steady stroke. Then repeat using overlapping strokes and apply your paint with precision. But if you keep the stroke in control and do the overlapping, it is easier to make that spread even.
Should You Use Painter’s Tape or Freehand the Edge?
No worries. Paint alone isn’t going to make a straight edge.
Fill in any cracks and holes, and sand down any awkward transitions beforehand.
Your finished edges are going to be crisp.
Hence, is it painter’s tape or just freehand? Use painter’s tape for newbies or when working with contrasting colors. Ensure the tape is firmly pressed onto the wall before painting.
If you have a little brush experience, though, freehanding can be faster. Plenty of experienced painters go straight for a decent brush, and don’t bother taping. It can save you a lot of time and give you a more organic finish on a bumpy surface.
If you tape, remove the tape according to the paint manufacturer’s instructions. The longer you wait to remove the tape, the higher the chances of pulling the paint off or having a jagged edge.
Common Mistakes to Avoid When Painting Ceiling Edges
Time for some lessons, because we all mess up! The worst is overloading your brush with paint. It causes drips and build-up along the corner (think: heavy ridges). Use light, small quantities of paint and even controlled strokes.
And then there is rushing prep. Dust, loose paint, cracks: they all may seem fine, but the second you roll or brush over them, they are magnified. Taking a little bit of time prepping can be the biggest transformation.
And whatever you do, don’t lean too far out over a non-sturdy chair or platform. Use a tall ladder that’s securely positioned (falls from ladders cause thousands of injuries and over a hundred deaths among U.S. workers each year, according to the CDC), or an extension pole that works with your paintbrush. When you’re comfortable and have a clear vantage point, doing a tight edge is a cinch. Are you ready to do those edges?
You may also want to read these:
When Should You Hire a Professional Painter?
Considering a DIY paint job? It can be great if you have the time, tools, and patience. But for rooms with high ceilings, large rooms, lots of trim detail, and multiple rooms, it can be a lot to take on.
A professional painter can give you insight into the best surface prep, the painting process, tip control, how to use a brush, and the finishing touches. They can move quickly around a room while keeping their lines steady and even. Don’t have your weekends free to paint and edge every room? Let SD Custom Painting do that for you!
Final Thoughts
Put your effort into preparation and applying control, rather than all the expensive equipment. Make sure the surface is clean, select the right brush, don’t overload it with paint, and work in small sections. Be mindful of your corners, and don’t brush over any areas that are already drying out.
Ready for detailed work? If you’re skilled at precise work, these methods will give you sharp, professional results. But for larger areas or if accuracy is something you’d rather leave to the pros, hire a professional painter.
FAQs
Is it possible to paint ceiling edges without painter’s tape?
It’s hard to believe that you don’t need painter’s tape! Experienced painters often freehand their edges using a good angled brush and steady hand. However, if you’re not confident in your brush skills, painter’s tape can be your saving grace, particularly between contrasting ceiling and wall colors.
How can I keep the paint from splashing onto the walls?
Concerned about the paint spattering on the wall? Don’t overload the brush, keep it low to the area, take your time on the last few inches, and don’t push too hard. As added insurance, lay down some painter’s tape. Proper lighting helps you identify exactly where your brush is.
How many coats of paint should be used along the perimeter of the ceiling?
Not sure how many coats? This really depends on the paint, color, paint surface, and coverage of the previous coat. Apply additional coats only after the time specified by the manufacturer for drying time if you do not get a uniform and sufficient coverage in the first coat.