
A painted ceiling with mold isn’t a nice sight, but what’s more, mold on the ceiling could indicate an overabundant amount of moisture in the room, insufficient ventilation, a condensation problem, or a leak that isn’t properly addressed. Cleaning the mold on the ceiling and watching it keep coming back can contribute to the paint and ceiling surface becoming damaged.
Safe removal of mold from painted ceilings or walls can give a homeowner the capacity to address a problem before it grows into an immense project and will also provide a deep cleaning. Locating the source of excess water, preparing a workspace and worker, removing the mold surface layer by layer, and determining if drywall or paint requires removal will remove mold from the painted surface. A larger or recurring problem is often best left to a professional, such as SD Custom Painting.
Table of Contents
ToggleWhy Does Mold Grow on a Painted Ceiling?
There are three requirements for mold growth: a nutrient source, moisture, and an environment where the mold can live. A ceiling is one of the best places for the last two to occur if there is a lot of moisture in the air. Normally, it appears in rooms that have either a lot of water, such as kitchens, bathrooms, and utility rooms, or a lack of ventilation.
Water in the air will collect and, in turn, condense on the cold object above.
This condensate has enough water for mold.
Leaks are also a common cause. In the event of roof damage, a plumbing leak, or a leak from the apartment above, water may be entering the ceiling from above. Wet drywall or wood may not dry out quickly enough, even after the water stain appears to be gone, and the mold will flourish. Finding the water source is just as important as scrubbing away the visible mold.
The presence of paint does not eliminate mold; if the painted surface has become saturated, or if the paint itself has worn away and cracked, it is able to hold moisture, which will sustain the mold growth. The only real way to deal with paint that has become infested is to address the moisture source first and then remove the mold, while also addressing the paint that may be covering it.
How to Remove Mold From Painted Ceiling: 5 Easy Steps
To begin with, look at the extent of ceiling damage. Is there just a bloom that comes off easily on the paint surface, or is there a sign of moisture going much further than the surface of the paint? Surface marks from the mold bloom can be removed carefully, but if the mold keeps coming back, it may be a sign that moisture has entered deeper than the surface. Is the plaster or drywall soft, bubbly, or peeling, or does it smell awful? If so, this will need a skilled eye.
If the situation seems to be well controlled, prepare the room for cleaning, wear appropriate protective clothing over skin and eyes, and ventilate the room as well as possible. Do not scrub or rub aggressively, as this may smear mold growth elsewhere on the ceiling or damage the underlying paint.
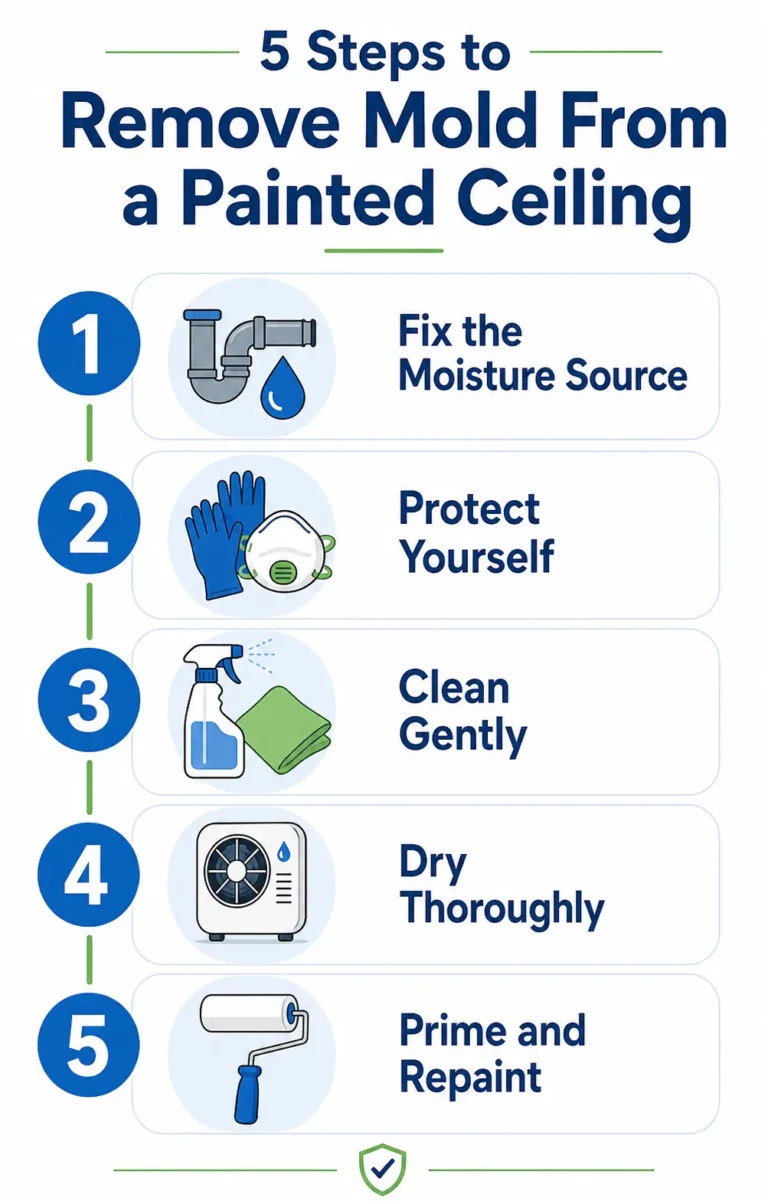
Step 1: Identify and correct the source of moisture.
The first task is to work out why moisture has appeared and reached the ceiling. Plumbing problems and leaks through a roof or into walls are the first things to check. Condensation, too much moisture in a bathroom, or too little ventilation can all contribute to mold.
You won’t truly solve the mold problem until you are sure the source has been taken care of, as the problem will quickly return even after the ceiling has been wiped clean of bloom.
Allow all damp areas to dry out thoroughly after the source has been corrected. Help to speed this up with a fan or by using a dehumidifier. Never paint over a damp ceiling; it’ll simply cause the paint to bubble away soon after.
Step 2: Protect yourself and the room.
Move the furniture away from the areas beneath the ceiling that need cleaning and cover everything nearby with dust sheets. Always make sure to wear gloves and eye protection, and a respiratory mask where necessary. Children and pets should be kept far away during this process.
A well-ventilated room is also helpful for any room with a ceiling that needs cleaning, particularly damp bathrooms, where the window and extractor fan should be on. Different types of cleaning fluids should never be mixed. In particular, bleach-based cleaners must not be mixed with cleaning fluids that contain ammonia, because a dangerous gas is released.
Step 3: Carefully clean the damaged ceiling.
Choose a suitable mold-cleaning liquid, follow the manufacturer’s specific directions for its use (the EPA also offers guidance on mold cleanup), and apply it carefully to the affected area. The product will work more effectively if it is left on for the time specified by the manufacturer, so do not be hasty and scrub away at once, as you will likely spread the mold around and potentially damage the paint and the plasterwork underneath.
Don’t rub too hard, and don’t saturate the ceiling; extra liquid that the drywall can’t absorb may damage the paint even more.
It is especially important with drywall to avoid too much moisture. If paint blisters, peels, or feels soft at any point, stop cleaning; these signs imply the damage goes right down to the underlying layers.
Step 4: Allow it to dry thoroughly.
Once it has been cleaned, let the damaged ceiling area dry out thoroughly before going any further, and make extra effort by increasing airflow and using dehumidifiers. Don’t attempt painting while it’s still a bit wet, as you could trap the moisture and ruin all your repainting efforts, because the paint will start to come away.
Once dry, check the ceiling carefully for remaining traces, and assume that more cleaning or priming will be needed if such traces are clearly visible.
Step 5: Paint the area or finish.
Once the ceiling has dried, a paint finish will need to be applied. If the area has flaking paint, it will need to be scraped and/or sanded before paint or repair is applied. Make certain that all necessary prep work is carried out; otherwise, the paint will not adhere properly or perform the way it should. The ceiling must be thoroughly dry and ready to accept any priming or painting.
Top-quality paint suitable for interior decoration, plus primers, can improve the finish of the ceiling. Color is no substitute, however, for solving the source of moisture in the ceiling. SD Custom Painting is available to advise you on whether to prep and repaint or repair.
How to Remove Mold From a Bathroom Ceiling
If you are wondering how to remove mold from a bathroom ceiling, the causes and factors contributing to mold growth should be addressed first, in addition to tackling the visible mold. Use the exhaust fan when showering and make sure it runs during and for a while after; ventilate the room whenever possible, and promptly address plumbing leaks and other damp areas.
A bathroom ceiling surface with mold must be dry after the growth is removed, and if black or dark growth repeatedly occurs in the same area, the problem likely relates to a consistent moisture source, such as an underlying (perhaps hidden) leak, or to poor airflow. In such a case, simply treating and painting a moldy ceiling may only solve the cosmetic problem.
When Should You Call a Professional?
There are some types of mold and situations that are too extensive for a do-it-yourself job, though. Large areas of mold, mold that keeps reappearing, or mold in the presence of water damage call for professional help. Soft, swollen, or unstable drywall likely has moisture damage beneath its surface and behind its painted layer.
The experts can also be a great help when it’s time to repaint over treated mold.
Repairing peeling paint, preparing the surface, fixing any gaps and gouges, priming, and applying a new coat of paint require careful preparation, so SD Custom Painting can help you return your ceiling to its former state once the root of the problem has been solved.
How to Prevent Mold From Returning
Simply getting rid of the mold will only lead to recurring problems. When you deal with the conditions for growth, namely moisture and air circulation, you have the mold under control. Run bathroom exhaust fans and try to ensure moist air does not linger in the bathroom for extended periods.
Check ceilings regularly. Look for water stains, peeling paint, curled paint, discoloration, and musty odors.
Find any leaks that exist in plumbing or roof structure and repair them immediately. If a reasonable relative humidity is maintained inside the house, mold growth is controlled.
Improve Bathroom Ventilation
Running your bathroom fan properly can make a huge impact. Turn the fan on while you shower or bathe and keep it running after you get out, especially if your bathroom remains very damp, as you may need better ventilation.
Take Prompt Care of Leaks
A tiny leak can soon become an enormous ceiling defect, whether under a bathroom, beneath a plumbing installation, or on the roof surface. Finding and fixing the cause promptly will keep the moisture away from your ceiling system and away from a mold-causing environment.
Select the Right Paint Type
Interior paint in a high-humidity area must be durable and suited to the room’s specific conditions. Proper pretreatment of the ceiling surface is just as important as selecting the right type of coating paint; otherwise, paint applied over a moist, contaminated surface might peel off quickly. Get a skilled painter’s advice on what preparation and painting system the room requires.
Common Mistakes to Avoid When Removing Ceiling Mold
Using good paint to paint over the mold is one of the most critical mistakes that can be made. This will provide temporary cover over discoloration but will do nothing to solve underlying issues of moisture and contamination beneath the paint and surface. If the stain is painted over, it becomes difficult to tell whether other issues are developing or conditions are making the problem worse.
Over-saturating the surface when cleaning is another mistake; ceiling drywall is a spongy material that can absorb moisture and make things worse. You would also not want to scrape ceiling drywall vigorously unless you know the surface that it adheres to and how to avoid getting particles airborne everywhere.
Finally, if mold keeps returning after cleaning, it doesn’t just mean that you couldn’t get rid of it. Mold coming back is usually a sign that there is a pre-existing cause that needs to be addressed, such as an existing water or ventilation problem.
Is It Better to Clean or Repaint a Moldy Ceiling?
For small patches of superficial mold on paint, cleaning it off may be sufficient. Once the cleaned area has dried, repainting slightly discolored areas may improve its look, provided it has been properly prepared for repainting.
If the staining on the paint is excessive, or if the paint has started to flake or bubble off the drywall, then it is likely the mold has burrowed beneath the surface of the paint. In such cases, repainting will cover up the problem temporarily, but not remove it.
Most homeowners wanting to resolve this problem should assess what has happened to the paint and the underlying surface and act accordingly. An unsure owner should get a professional to inspect the ceiling and propose the best way forward. SD Custom Painting can professionally repair and repaint the ceiling once appropriate steps have been taken to address the issue.
Final Thoughts
Removing visible mold and water stains is just an initial step in handling painted ceiling problems. Locating the moisture source and carefully drying the surface before repairing and repainting the ceiling are essential for successfully treating painted ceiling mold.
If a homeowner has relatively minor surface mold, they can take care of the minor repair and control surface conditions by regulating air in the home.
Complex and recurrent problems may require professionals to investigate, for homeowners who are truly serious about getting rid of ceiling mold. Controlling indoor humidity will help homeowners keep their homes safe for occupants.
Frequently Asked Questions
Can mold damage a painted ceiling?
Yes, a persistently moist environment that causes mold can cause staining, peeling, and blistering of the paint, along with deterioration of whatever lies underneath.
When do I need to get a moldy ceiling properly repaired by a professional?
You should seek a professional if mold covers a substantial area, keeps coming back, is part of a water-related issue, or has caused severe damage, or if the ceiling surface itself has become soft, swollen, or deteriorated. Professional consultation is warranted in all of these circumstances.
Can SD Custom Painting repaint a ceiling after I’ve addressed a mold problem?
SD Custom Painting is more than happy to help with the preparation process, make repairs with plaster, apply a primer to seal, and then repaint the ceiling after the underlying mold and moisture issue has been handled.