Painting aluminum siding is a cost-effective way to revitalize your home’s exterior and boost its curb appeal. It brings fresh color and extended life to the material, often at a fraction of the cost of replacement. With the right preparation, the process of how to paint aluminum siding is a project any dedicated homeowner can tackle.
This in-depth guide provides all the expert techniques, material choices, and proven steps you need for a professional-quality paint job. We will ensure your repainting aluminum siding project results in a durable finish that resists peeling and fading for years to come.
Table of Contents
ToggleCan You Paint Aluminum Siding?
Yes, you can paint aluminum siding successfully. The material accepts paint well when properly prepared.
Aluminum siding was popular from the 1940s through 1970s. It offers excellent weather protection and insulation. The main drawback is color fading over time. The factory finish breaks down under UV exposure, creating that chalky residue you see on older homes.
Painting aluminum siding extends its life by 15-30 years. You’re not just improving appearance. The fresh coat protects against oxidation and corrosion. This maintains the structural integrity of your home’s exterior.
Modern acrylic paints bond extremely well to aluminum surfaces. They flex with temperature changes, preventing cracks and peeling. This wasn’t always true with older oil-based products, which explains why some people think aluminum can’t be painted.
Before You Begin: What You Need to Know
Testing for Lead Paint
Homes built before 1978 may have lead-based paint. Buy a lead test kit from any hardware store for $10-15. Follow the instructions carefully. If lead is present, hire a licensed abatement specialist. This isn’t optional; lead exposure causes serious health problems.
Checking for Damage
Walk around your house and inspect every panel. Look for dents, cracks, or loose sections. These need repair before painting aluminum siding. Small dents usually don’t affect paint adhesion, but large damage should be patched.
Aluminum oxidation appears as white, powdery residue. Run your hand across the surface. If white powder transfers to your skin, you have oxidation. This must be removed completely or paint won’t stick.
Check for mildew around shaded areas, near ground level, and under eaves. Mildew looks like dark spots or streaks. It grows through paint if not killed first.
Gathering Your Tools and Materials
High quality tools make this job easier and deliver better results.
Essential Tools:
- Pressure washer (1,700-2,800 PSI) or garden hose with spray nozzle
- Extension ladder
- Drop cloths or plastic sheeting
- Paint sprayer, roller, or brushes
- Mixing buckets
- Scrub brushes and abrasive sponge
- Safety gear: gloves, goggles, mask
Materials You’ll Need:
- Trisodium phosphate (TSP) cleaner
- Chlorine bleach
- Acrylic primer for metal surfaces
- High quality acrylic exterior paint
- Painter’s tape
- Silicone caulk
Depending on the size of your project, you might need multiple gallons of primer and paint. A gallon typically covers 200-400 square feet per coat.
Best Weather for Painting
Temperature matters significantly. Paint between 50°F and 85°F for optimal results. Avoid painting in direct sunlight; surface temperatures can exceed 100°F, causing paint to dry too fast and not adhere properly.
Low humidity (below 50%) is ideal. High moisture in the air extends drying time and can cause runs or sags. Never paint if rain is expected within 24 hours.
Early morning or late afternoon often provides the best conditions. You avoid intense sun while temperatures remain moderate.
How to Prep Aluminum Siding for Paint
Preparation determines success. Skip steps here and your paint job fails within months.
Step 1: Protect Surrounding Areas
Cover plants, walkways, and anything near your house with drop cloths. Tape plastic sheeting over windows and doors. Cleaning solution and paint overspray travel farther than you think.
Remove or cover exterior light fixtures, outlet covers, and house numbers. This prevents accidental paint coverage and makes cleanup easier.
Step 2: Clean the Surface Thoroughly
Dirt, mildew, and oxidation prevent good paint adhesion. Professional painters spend more time cleaning than painting. There’s a reason for this.
- Create Your Cleaning Solution: Mix 1 cup TSP, 1 cup chlorine bleach, and 1 gallon of water. This combination removes dirt, kills mildew, and cuts through oxidation. Wear gloves and eye protection when handling this mixture.
- Using a Pressure Washer: Set pressure between 1,700-2,800 PSI. Higher pressure can damage siding. Start at the top and work down, spraying at a downward angle. Never spray upward; you’ll force water behind panels, causing mold and rot.
- Hold the nozzle 12-18 inches from the surface. Keep it moving to avoid etching the aluminum. Overlap your passes slightly to ensure complete coverage.
- Manual Cleaning Method: For smaller areas or if you lack a pressure washer, use an abrasive sponge on an extension pole. Dip it in your cleaning solution and scrub in circular motions. This method takes longer but gives you more control around delicate areas.
Step 3: Remove Chalking and Oxidation
After initial cleaning, check for remaining chalk. If your hand still picks up white residue, clean again. Some heavily oxidized surfaces need extra attention.
For stubborn oxidation, use fine-grit sandpaper (150-grit) or a sanding sponge. Work gently; you’re removing oxidation, not the aluminum itself.
Step 4: Rinse and Dry
Rinse thoroughly with clean water from your garden hose. Work top to bottom again. Any cleaning solution residue will interfere with primer adhesion.
Let everything dry completely, this takes 2-3 days minimum. Touch the surface to verify it’s bone dry before priming. Painting over damp siding causes peeling and bubbling.
Step 5: Repair and Caulk
Fill any gaps between siding panels with silicone caulk. Smooth it with your finger for a clean finish. Replace severely damaged panels if necessary.
Check all trim boards and corner pieces. These often separate from the main siding over time.
How to Paint Aluminum Siding: Step by Step Guide
Step 1: Apply Primer
Primer creates the bond between aluminum and your finish coat. Don’t skip this step.
Choose acrylic primer specifically designed for metal surfaces. Avoid oil-based primer; it doesn’t flex with aluminum’s expansion and contraction.
Apply primer with a roller for large areas. Use a brush for edges, corners, and trim. Work in sections, maintaining a wet edge to prevent lap marks.
One coat usually suffices on previously painted surfaces in good condition. Bare metal or heavily weathered areas may need two coats. Check the manufacturer’s recommendations.
Allow 4-5 hours drying time before painting. Touch a hidden area to verify it’s completely dry.
Step 2: Choose the Right Paint
The best paint for painting aluminum siding is 100% acrylic exterior paint. This formula offers superior adhesion, flexibility, and color retention.
Satin or semi-gloss finishes work best. They hide minor imperfections better than flat paint while resisting dirt and mildew. Gloss finishes highlight every dent and wave in the siding.
Quality matters significantly. Premium paint costs $40-60 per gallon but lasts twice as long as budget options at $25-30 per gallon. You’ll use roughly 1 gallon per 300 square feet per coat.
Lighter colors reflect heat better and fade less noticeably. Dark colors absorb heat, potentially reaching temperatures that shorten paint life. If you choose dark colors, buy paint specifically formulated for hot surfaces.
Step 3: Apply the First Coat
Start at the top and work down. This prevents drips from marring finished sections.
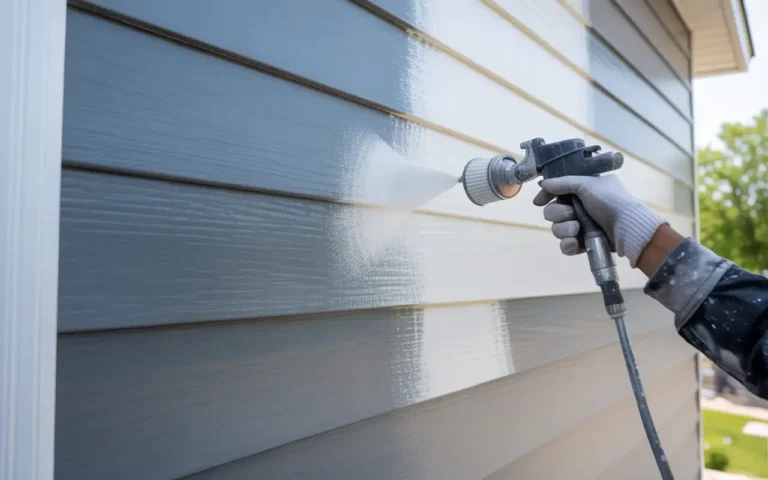
- Using a Paint Sprayer: An airless sprayer delivers the most professional results for aluminum siding house paint. It covers large areas quickly with even thickness. Hold the gun 12 inches from the surface, moving at a steady pace. Overlap each pass by 50%.
- Practice on cardboard first if you’re new to spraying. The learning curve is short but important.
- Using a Roller: A 9-inch roller covers efficiently. Load it evenly by rolling in your paint tray. Apply with long, smooth strokes following the siding orientation. Horizontal siding gets horizontal strokes.
- Using a Brush: Brushes work well for trim and small areas. They’re slowest for large surfaces but give excellent control. Use a 4-inch brush for siding panels.
- Maintain consistent thickness. Thin coats dry evenly and don’t sag. Heavy coats waste paint and look worse.
Step 4: Apply the Second Coat
Wait at least 4 hours between coats, longer in humid conditions. The surface should feel completely dry to touch.
Two thin coats always outperform one thick coat. The first coat may show streaks or thin spots that’s normal. The second coat evens everything out.
Repainting aluminum siding properly means not rushing. If you see the old color showing through after two coats, you might need a third coat. This is rare with quality paint over properly primed surfaces.
Step 5: Clean Up and Inspect
Remove painter’s tape while paint is slightly tacky this prevents peeling. Pull at a 45-degree angle, away from the painted surface.
Walk around your house in good light. Look for missed spots, drips, or uneven areas. Touch up immediately while you have paint mixed.
Clean your tools according to paint manufacturer instructions. Acrylic paint washes out with soap and water before it dries.
Maintaining Painted Aluminum Siding
Proper maintenance extends your paint job’s life significantly.
Annual Cleaning
Once per year, spray down your siding with a garden hose. Use a soft brush and mild detergent for stubborn dirt. This prevents buildup that degrades paint over time.
Avoid pressure washing unless necessary. When you do pressure wash, use low pressure (under 1,500 PSI) and wide spray patterns.
Preventing Damage
Trim trees and bushes back from your house. Branches scratch paint and hold moisture against siding. Maintain at least 12 inches of clearance.
Check caulk lines annually. Recaulk gaps before water infiltration starts. This prevents rot in sheathing behind your siding.
Touch-Up Strategy
Keep leftover paint for touch-ups. Store it in airtight containers in a temperature-controlled space. Paint lasts 2-3 years stored properly.
Address chips and scratches immediately. Small touch-ups prevent larger problems. Clean the area, prime if needed, and paint.
When to Repaint
Expect to repaint every 10-15 years with quality products and good maintenance. Signs you need to repaint include:
- Widespread fading or color change
- Chalking returning to the surface
- Paint cracking or peeling
- Exposed aluminum showing through
Good paint for aluminum siding in proper conditions can last even longer. Some premium brands guarantee 15-year durability.
How Much Does it Cost to Paint Aluminum Siding?

Understanding costs helps you budget and decide between DIY and professional work.
DIY Cost Breakdown
For a typical 1,500 square foot house (exterior surface area):
Materials:
- Primer (2-3 gallons): $80-150
- Paint (4-5 gallons): $200-300
- Cleaning supplies (TSP, bleach): $30-50
- Brushes, rollers, tape: $50-75
- Caulk and repair materials: $40-60
- Total Materials: $400-635
Equipment Rental (if needed):
- Pressure washer (1 day): $60-80
- Paint sprayer (2 days): $100-150
- Extension ladder: $40-60
- Equipment Total: $200-290
DIY Project Total: $600-925
This assumes you already have basic safety equipment and drop cloths. First-time painters should budget toward the higher end.
Professional Painting Costs
Professional services include labor, materials, and equipment. Costs vary by region and project complexity.
National Average Rates:
- Labor and materials: $2.50-$4.50 per square foot
- 1,500 sq ft house: $3,750-$6,750
- 2,500 sq ft house: $6,250-$11,250
Cost Factors:
- House height (single vs. multi-story)
- Surface condition (more prep = higher cost)
- Paint quality selection
- Trim and detail work amount
- Geographic location
- Season (off-season may offer discounts)
San Diego area costs typically run $3.00-$5.00 per square foot due to higher labor rates and cost of living.
DIY vs. Professional: Making the Choice
Choose DIY if:
- You have time (2-4 weekends for an average house)
- You’re comfortable on ladders
- Your siding is in good condition
- You want to save $3,000-$5,000
Hire professionals if:
- Your house is over two stories
- Extensive repair needed
- You lack time or equipment
- You want guaranteed results
- Safety concerns exist
Many homeowners split the difference, handle prep work themselves and hire pros for painting. This reduces costs by 20-30% while ensuring quality finish.
Common Mistakes to Avoid
Learning from others’ errors saves time and money.
Skipping Surface Preparation
The biggest mistake is rushing prep. Paint won’t bond to dirty, chalky surfaces no matter how many coats you apply. Spend 60-70% of project time on cleaning and prep.
Using Wrong Paint Type
Oil-based paint fails on aluminum. It doesn’t flex with temperature changes and peels within years. Always use acrylic latex paint formulated for metal.
Painting in Poor Weather
Temperature extremes and high humidity guarantee problems. Paint won’t cure properly, leading to early failure. Check your local weather forecast and plan accordingly.
Applying Too Thick
Heavy coats sag and take forever to dry. Thin coats dry faster, bond better, and look smoother. Two thin beats one thick every time.
Ignoring Drying Time
Rushing between coats causes adhesion problems. The base coat must cure fully before adding another layer. Patience pays off here.
Forgetting Primer
Bare aluminum or heavily weathered surfaces need primer. The primer blocks oxidation and gives paint something to grab. Skipping it leads to early peeling.
Choosing the Right Paint Color
Color selection affects more than appearance.
Heat Considerations
Light colors reflect sunlight, keeping your house cooler and extending paint life. White, cream, and light gray are practical choices.
Dark colors absorb heat. Exterior surface temperatures can reach 150°F+ on dark siding. This accelerates paint degradation. If you choose dark colors, use premium paint with heat-resistant formulas.
Resale Value Impact
Neutral colors appeal to more buyers. Beige, gray, and off-white remain safe choices. Bold colors limit your buyer pool if you sell within a few years.
Check neighborhood trends. Homes that blend reasonably with surroundings sell faster.
HOA and Local Restrictions
Many homeowners’ associations restrict color choices. Check your CC&Rs before buying paint. Some municipalities also regulate historic districts.
Get approval in writing before starting. Repainting due to violations costs thousands.
Testing Before Committing
Buy sample sizes and paint test patches on less visible areas. View them at different times of day. Colors look dramatically different in morning vs. afternoon light.
Live with test patches for a week before buying full quantities.
Troubleshooting Common Problems
Even careful work sometimes encounters issues.
Paint Peeling After Application
Causes:
- Inadequate surface cleaning
- Moisture trapped under paint
- Skipped primer
- Paint applied too thick
Solution: Scrape off peeling sections. Clean and dry thoroughly. Prime bare areas. Repaint with thin coats.
Uneven Color or Streaks
Causes:
- Inconsistent application thickness
- Poor paint mixing
- Wrong roller nap length
- Painting in direct sun
Solution: Apply additional coats for even coverage. Use proper technique with consistent pressure.
Chalking Returns Quickly
Causes:
- Surface not cleaned well initially
- Low-quality paint used
- No primer applied
Solution: Strip affected areas down to clean aluminum. Prime properly. Use premium acrylic paint.
Bubbling or Blistering
Causes:
- Painting over wet surfaces
- Trapped moisture
- Painting in high heat
Solution: Pop blisters and sand smooth. Ensure the surface is completely dry. Prime and repaint.
When to Consider Professional Help
Some situations call for expert assistance.
Multi-Story Homes
Heights above 15-20 feet require specialized equipment and safety training. Professional crews have proper scaffolding and fall protection.
The risk of serious injury outweighs DIY savings on tall houses.
Extensive Damage
If more than 20% of your siding needs repair, get a professional assessment. Widespread damage might indicate underlying problems needing expert diagnosis.
Time Constraints
Professional crews complete in days what takes homeowners weeks. If you need fast results for a sale or event, hiring makes sense.
Quality Guarantees
Reputable contractors warranty their work for 2-5 years. This protection provides peace of mind worth the extra cost for many homeowners.
Revitalize Your Home's Curb Appeal with SD Custom Painting Company
Painting aluminum siding transforms your home’s appearance and protects your investment. Whether you tackle this project yourself or need professional expertise, proper technique makes all the difference.
San Diego Custom Painting specializes in aluminum siding restoration. Our experienced team handles everything from minor touch-ups to complete exterior transformations. We use premium materials and time-tested techniques that deliver lasting results.
Looking for reliable exterior painting services in San Diego? We offer free estimates, detailed project timelines, and guaranteed satisfaction. Our crews complete most homes in 3-5 days with minimal disruption to your routine.
Contact us today to discuss your project. We’ll assess your siding condition, recommend the best approach, and provide a detailed quote.
Final Words
Painting aluminum siding ranks among the best home improvement investments. For $600-$6,000 depending on your approach, you add years of protection and dramatically improve curb appeal. The process requires patience and attention to detail, but results justify the effort.
Success comes down to three things: thorough cleaning, proper primer, and quality paint. Master these basics and your paint job will look professional and last a decade or more.
Start planning your project now. Gather materials, check weather forecasts, and set aside adequate time. Your home deserves the care, and you’ll be proud of the transformation.
FAQs About Painting Aluminum Siding
How long does painted aluminum siding last?
With quality materials and proper application, expect 10-15 years before repainting. Premium paints with good maintenance can last 15-20 years.
Can I paint aluminum siding without a primer?
Primer is strongly recommended, especially on weathered surfaces or bare aluminum. It ensures proper adhesion and longevity. Skipping primer often leads to early failure.
What’s the best time of year to paint aluminum siding?
Late spring and early fall offer ideal conditions. Temperatures between 50-85°F and low humidity provide the best paint curing. Avoid winter and midsummer extremes.
Do I need to remove old paint first?
Usually no. As long as existing paint is solid and adheres well, you can paint over it after cleaning. Only remove loose, peeling, or bubbling paint.
Can I change from light to dark color?
Yes, but dark colors require premium paint formulated for high temperatures. Dark siding absorbs more heat, which can degrade standard paint faster. Expect to pay 20-30% more for heat-resistant formulas.
How many coats of paint do I need?
Two coats over primer is standard. Very dark colors or dramatic color changes might need three coats. One thick coat never works as well as multiple thin coats.
Will painting aluminum siding increase home value?
Fresh paint typically returns 50-100% of cost in increased value. More importantly, it makes your home more attractive to buyers and can speed up sales.
Can I paint in direct sunlight?
Avoid it when possible. Direct sun causes paint to dry too quickly, preventing proper adhesion. Paint early morning or late afternoon, following the shade around your house.
How do I know if I have enough paint?
Calculate your exterior square footage (length × height for each wall, minus windows and doors). Divide by 300-350 square feet per gallon. Buy 10-15% extra for waste and touch-ups.
What if it rains after painting?
If paint has dried 24 hours, light rain won’t harm it. Paint needs 2-3 days to fully cure. Heavy rain before full curing can cause spotting or wash-off. Check your weather forecast carefully before starting.