Painting a ceiling can feel overwhelming. Most people avoid it because they worry about drips, roller marks, and neck pain. But here’s the truth: with the right tools and techniques, you can paint a ceiling like a professional without the mess or frustration. The best way to paint a ceiling involves proper preparation, quality materials, and proven rolling techniques.
This guide walks you through every step of how to paint a ceiling from start to finish. You’ll learn exactly which supplies to buy, how to prepare your room, and the proven techniques that prevent common mistakes. Whether you’re tackling your first DIY painting project or looking to improve your skills, these tips for painting a ceiling will help you achieve professional results. By the end, you’ll have a fresh, clean ceiling that transforms your entire space.
Table of Contents
ToggleQuick Answer: To paint a ceiling successfully, you need a 9-inch roller with the correct nap thickness, an extension pole, quality ceiling paint, and proper preparation. Always paint the ceiling first before walls, work in sections while maintaining a wet edge, and use a W-pattern rolling technique to avoid lap marks. The entire process takes 3-4 hours for a standard room.
Supply Checklist
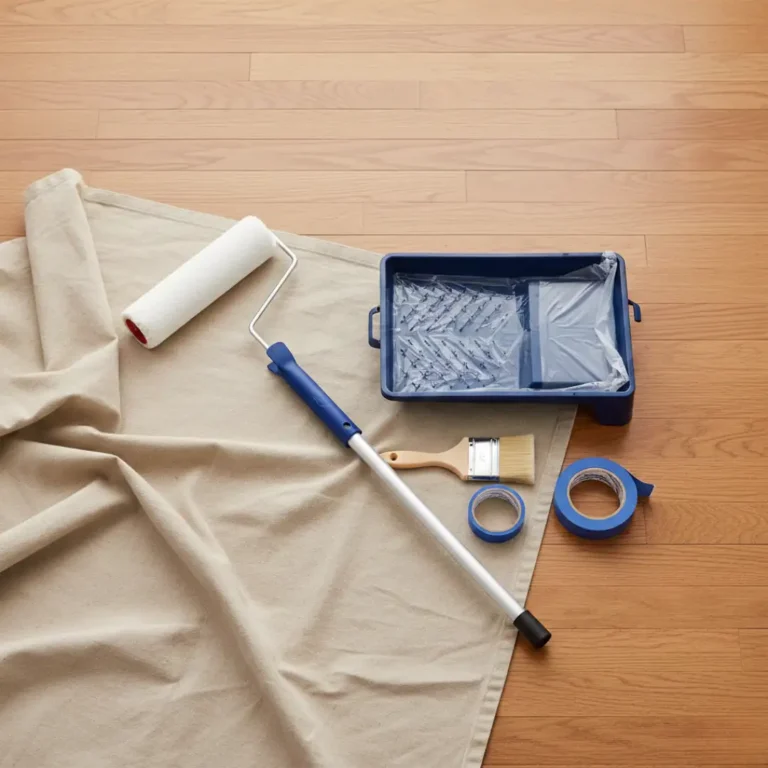
Essential Tools:
- 9-inch paint roller frame with extension pole
- Roller covers (⅜-inch nap for smooth ceilings, ½ to ¾-inch nap for textured)
- 2-inch angled brush
- Paint tray with liner
- Painter’s tape (1.5 to 2 inches wide)
- Canvas drop cloths
- Step ladder
Paint Materials:
- Flat ceiling paint (1 gallon covers 350-400 square feet)
- Primer (for stains or color changes)
- Safety glasses
Cost Estimate: $100-160 total. Quality ceiling paint costs $25-45 per gallon. Most ceilings need one coat for white over white. Color changes require two coats.
What to Consider Before Painting a Ceiling

Choose the Right Paint Color
White remains the most popular choice because it reflects light and makes rooms feel larger and brighter. Colored ceilings create dramatic effects and add personality. A ceiling painted slightly lighter than walls adds visual depth. Deep colors like navy make high ceilings feel cozier and more intimate.
Check Your Ceiling Type
Smooth drywall needs a ⅜-inch roller nap for even coverage. Textured or popcorn ceilings require ½ to ¾-inch nap to reach into crevices and texture patterns. Wrong nap thickness creates uneven coverage and wastes paint.
Paint the Ceiling First or the Walls?
Always paint the ceiling before walls. This smart approach prevents worrying about ceiling drips landing on freshly painted walls. Any ceiling splatter on unpainted walls gets covered when you paint them later.
When You Need Primer
Most ceilings don’t need primer over existing paint in good condition. Use primer for water stains or smoke damage, bare drywall, major color changes, or glossy surfaces that need better paint adhesion.
How to Paint a Ceiling in 6 Easy Steps
Step 1: Clear and Protect the Room (15-30 minutes)
Remove furniture or move it to the room’s center. Cover with drop cloths. Lay canvas drop cloths across the floor. Remove or tape off ceiling light fixtures after turning off power at the breaker. Apply painter’s tape along wall tops where they meet the ceiling.
Step 2: Repair and Clean (20-45 minutes)
Fix cracks or holes with spackling compounds. Sand smooth when dry. Clean the ceiling with a damp cloth to remove dust and grease. Let it dry completely.
Step 3: Cut In the Edges (20-30 minutes)
Pour paint into your tray. Dip your angled brush one-third into paint. Start in a corner where the ceiling meets the wall. If painting walls later, brush along the ceiling and feather 2-3 inches down the wall. Work in 3-5 foot sections to maintain a wet edge.
Step 4: Load Your Roller (1-2 minutes per load)
Attach the extension pole to your roller. Dip the roller in paint and roll it up the tray’s ramp until evenly coated but not dripping.
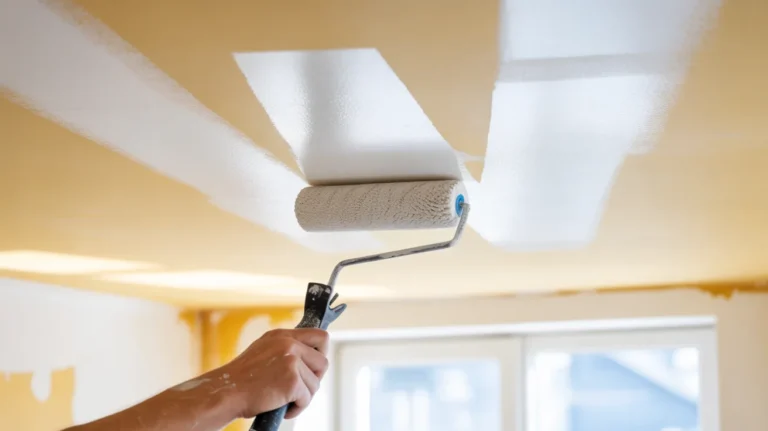
Step 5: Roll Using Proper Technique (1-2 hours)
Start near a window. Use a W-pattern technique by rolling a “W” shape about 3 feet wide, then fill it in with overlapping strokes. This prevents lap marks.
Always maintain a wet edge. Work back into painted areas while still wet. Roll slowly near walls. Apply steady, even pressure. Too much pressure creates drips. Too little leaves thin spots.
Step 6: Apply Second Coat if Needed (wait 2-4 hours)
Check the paint label for drying time. Look at your ceiling from different angles. If you see the old color showing through, apply a second coat using the same technique.
White Painted Ceiling Before and After
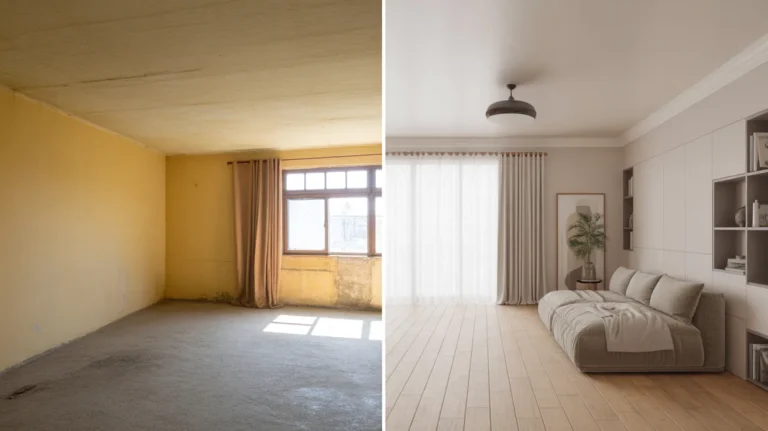
A freshly painted white ceiling brightens rooms dramatically. White ceilings reflect up to 80% of light, making spaces feel larger. The transformation is immediate and cost-effective. It’s one of the best ways to upgrade your home’s interior appearance and increase home value.
Maintaining Your Newly Painted Ceiling
Dust your ceiling every few months using a microfiber duster. Spot clean stains immediately. Fix leaks before treating water stains with primer. Keep leftover paint for touch-ups. Ceiling paint lasts 5-10 years. Run exhaust fans in bathrooms and kitchens to prevent moisture damage.
Additional Tips for Ceiling Painting
- Best Conditions: Paint on dry days with moderate temperatures (60-75°F). High humidity causes drips and slow drying.
- Prevent Discomfort: Take breaks every 20-30 minutes. Stretch your neck and shoulders. Using a paint roller on the ceiling with an extension pole reduces strain significantly compared to working from a ladder.
- Common Mistakes to Avoid: Don’t overload your roller with too much paint. Don’t rush between sections, which creates visible lap marks. Don’t skip primer when covering stains or changing colors dramatically.
- Different Ceiling Types: Popcorn ceilings need thick nap rollers and gentle pressure to avoid damaging texture. Vaulted ceilings require longer extension poles and extra safety precautions when working at heights.
- Cleanup: Rinse latex paint tools thoroughly with soap and water until water runs clear. Dispose of paint per local regulations.
Bottom Line
Painting a ceiling transforms a room without major renovation costs. The process takes patience and the right technique, but the results are worth the effort. You’ll save hundreds compared to hiring professional painters while gaining valuable DIY skills.
If you prefer professional results without the work, San Diego Custom Painting offers expert interior painting services in San Diego. Our experienced team handles everything from ceiling painting to complete interior makeovers. We use premium materials and proven techniques that ensure long-lasting, beautiful results.
Whether you tackle this project yourself or hire professionals, a freshly painted ceiling makes your entire home look and feel better. The time and effort invested pays off in improved appearance, brighter rooms, and increased home value.
FAQs About How to Paint a Ceiling
How long does it take to paint a ceiling?
A standard 12×12 room takes 3 to 4 hours including prep work and one coat. Larger rooms or two-coat jobs take longer. Your first ceiling painting project will take more time as you learn the techniques.
Can I paint a ceiling with a brush only?
You can, but it’s much slower and harder to get even coverage. A roller covers large areas quickly and smoothly. Use a brush only for cutting in edges and around fixtures.
Do I need special paint for bathrooms?
Bathroom ceilings need mildew-resistant paint due to moisture. Look for paint labeled for bathrooms or high-moisture areas. Proper ventilation extends paint life in bathrooms.
What’s the best time of day to paint a ceiling?
Morning or early afternoon provides the best natural light for spotting coverage issues. Avoid painting late in the day when fading light makes it hard to see wet paint clearly.
How do I avoid roller marks on the ceiling?
Use the W-pattern technique and maintain a wet edge. Don’t press too hard on the roller. A quality roller cover with the correct nap also prevents marks.
Should I remove the popcorn ceiling before painting?
Not necessarily. You can paint over the popcorn texture if it’s in good condition. Removal is messy and time-consuming. Paint it with a thick nap roller instead.
How many coats does a ceiling need?
One coat usually covers if you’re painting white over white with quality paint. Color changes or covering stains typically need two coats for full coverage.
Can I use wall paint on a ceiling?
Ceiling paint is formulated differently than wall paint. It’s thicker, splatters less, and has a flat finish that hides imperfections. Use ceiling-specific paint for best results.