Most people who own a home agree that painting trim is the most annoying part of any room makeover. You want those clean, straight lines that make a room look great, but bad tools can leave brush marks and messy edges. The best paint brush for trim is a 2 to 2.5-inch angled sash brush with synthetic bristles. It gives you clean lines on baseboards, door frames, and window trim without much effort. This guide covers which brushes actually work, what to look for before buying, and how to get a smooth finish every single time.
In this guide, you will learn exactly which brushes the pros use and why. We will cover the specific bristle types for different paints and provide a reviewed list of the top tools currently on the market. By the end, you will know how to select a high-quality brush that saves you time and eliminates the need for miles of painter’s tape.
Table of Contents
Toggle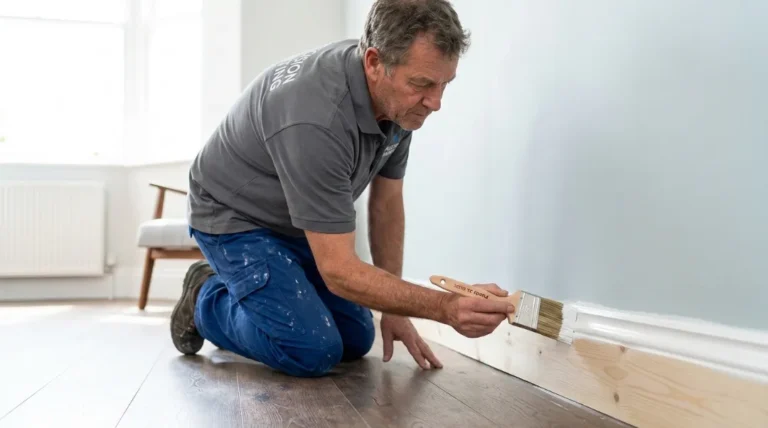
Why Choosing the Right Brush Matters
The brush you pick directly affects how your trim looks when paint dries. A good trim paint brush holds more paint, lays it down smoothly, and keeps edges clean. A cheap or wrong brush leaves drag lines, uneven coverage, and bristle marks you cannot fix later.
Professionals do not use one brush for every job. They pick brushes based on the surface, paint type, and how much detail work is needed. That same logic applies to you, even for a single room.
Paint is also wasted when the brush is bad. It takes longer because you have to reload it more often. Bad bristles that are stiff leave lines that can be seen even after the paint is dry. Having the right brush will help you save time, paint, and stress.
Types of Brushes Used by Professionals
Professional painters choose brushes based on the specific shape of the trim and the type of paint being used. For water-based latex or acrylic paints, they use synthetic brushes. For oil-based stains or primers, they prefer natural China bristles. The most common shapes used for trim include angled sash brushes for precision and round brushes for detailed moldings.
Not every brush type is built for trim. Here is what each one does and when to use it.
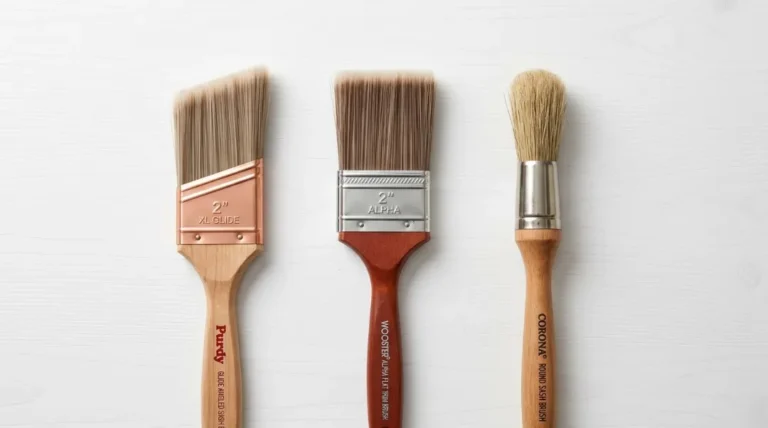
Angled Sash Brush
This is the standard trim brush used by painters everywhere. The slanted bristle edge lets you cut in along edges and corners with precision. You get straight lines without tape, which saves prep time.
A 2-inch angled sash brush works best for window trim, door casings, and narrow molding. A 2.5-inch version covers baseboards faster. The angle lets you see where the bristles land, so you stay in control.
Flat Trim Brush
Flat brushes have straight-cut bristles. They cover wider, flat surfaces like door frames and long baseboard runs. They hold more paint than angled brushes, so you spend less time reloading.
A 2.5 to 3-inch flat brush is a good choice for your first coat on wide baseboards. Switch to an angled brush for detailed second-coat work near floors and walls.
Round Sash Brush
Round sash brushes have a circular bristle profile. They get into recessed areas and tight corners that flat and angled brushes miss. Use them around raised molding profiles and window sashes with complex shapes.
Most DIY projects do not need a round sash brush unless you have detailed architectural trim.
Natural vs. Synthetic Bristles
Natural bristle brushes, made from animal hair like China bristle or ox hair, work best with oil-based paint and alkyd paint. They absorb water and lose their shape with latex paint, so avoid them for water-based projects.
Synthetic bristle brushes made from nylon, polyester, or a blend of both are built for latex paint and water-based paint. They stay stiff in water, clean up easily, and last longer. Most interior trim painting today uses latex paint, so synthetic bristles are the right call for most homeowners.
Hybrid or blended brushes mix natural and synthetic bristles. They work with both paint types and cost less than fully natural options. They are a decent middle-ground for painters who switch between paint types.
Which Brush Works Best for Each Surface
Matching your brush to the surface saves time and gives better results. Here is a quick breakdown.
Surface | Best Brush | Ideal Size |
Baseboards | Flat or angled trim brush | 2.5 inch |
Door casings | Angled sash brush | 2 inch |
Window sashes | Angled or round sash brush | 1.5 to 2 inch |
Crown molding | Angled sash brush | 2 inch |
Chair rail or wainscoting | Flat trim brush | 2.5 to 3 inch |
Raised molding profiles | Round sash brush | 1.5 inch |
What to Look for When Buying a Trim Paint Brush
Brush Width and Size
A 2 to 2.5-inch brush handles most trim work. Narrower brushes make you reload too often. Wider brushes are harder to control near walls and floors. Match the width to your trim width for best results.
Bristle Stiffness
Medium stiffness is best for trim. Too stiff and every brush stroke shows in the dried paint. Too soft and you lose control at the edges. Quality brushes use tapered bristles that come to fine points. Press the bristles against your hand. They should spring back right away.
For cutting in, slightly stiffer bristles help you hold a straight line. As bristles soften from use, consider switching to a new brush for detail work.
Handle Design
Wood handles give the best grip and do not get slippery when paint runs. Plastic handles are lighter but can slip during long sessions. Beavertail handles spread pressure across your palm and reduce fatigue. A rat-tail handle suits painters who prefer a pencil-like grip for fine detail work.
Aim for a 6 to 8-inch handle for most trim work. Shorter handles give better control. Longer handles let you reach without crouching but reduce precision.
Flagged vs. Tapered Bristles
Flagged bristles have split ends that hold more paint and create smoother coverage. Tapered bristles come to a fine point for precise edge work. The best quality brushes for trim combine both. Look for tapered flagged bristles for clean lines and smooth finishes.
MDF Trim vs. Natural Wood Trim: Does the Brush Change?
Yes, the surface material matters, and most guides skip this.
Natural wood trim has grain. You need a medium-stiffness bristle brush to push paint into the pores. A softer brush skims the surface and leaves patchy coverage.
MDF trim is smooth and usually pre-primed. Use a softer synthetic brush. Stiff bristles drag across MDF and leave visible texture lines. Brands like Wooster Silver Tip work well on MDF.
Brush Budget Guide: What to Expect at Each Price Point
Not every project needs the same investment. Here is what you actually get at each price range.
Price Range | What You Get | Best For |
Under $10 | Basic synthetic bristles, plastic handle, limited durability | Single-use or one-room project |
$10 to $20 | Quality nylon/polyester blend, wood handle, holds shape well | Most DIY homeowners, multi-room projects |
$20 to $35 | Professional-grade, tapered flagged bristles, ergonomic handle | Repeated use, professional finish quality |
$35 and above | Top-tier construction, ultra-fine bristles, premium handles | Pros, large projects, long-term investment |
A $5 brush sheds bristles in the paint, leaves streaks, and wears out after one job. A $15 to $20 brush from a trusted brand pays for itself in time saved on touch-ups alone.
Top 5 Best Paint Brushes for Trim and Baseboards
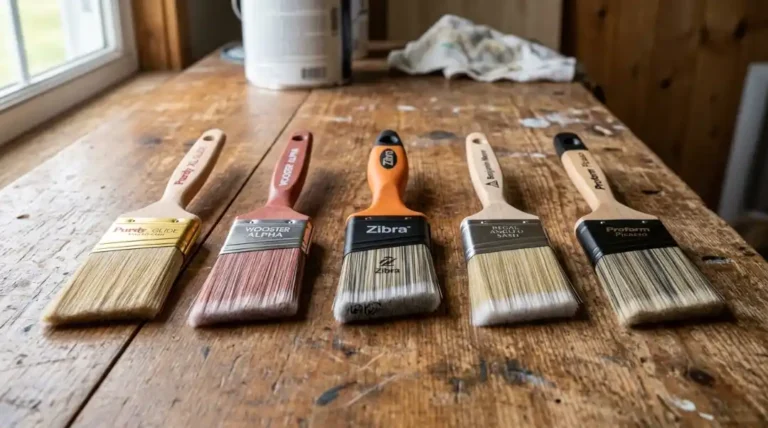
These five brushes consistently perform well on trim and baseboard projects. Each one is tested for real-world use.
1. Purdy XL Series Angular Trim Brush (2.5-inch) | $18 to $22
This is one of the best trimming paint brushes you can buy for interior work. The nylon and polyester blend holds paint well and lays it down without streaks. The solid wood handle stays comfortable through long sessions. Bristles keep their shape after multiple cleanings.
Best for: latex paint on door casings, window trim, and baseboards.
2. Wooster Shortcut Angle Sash Brush (2-inch) | $12 to $16
A great option for beginners learning cutting-in technique. The shorter handle gives precise control in tight spaces. Synthetic bristles stay stiff through multiple cleanings and do not splay out. Good value without sacrificing finish quality.
Best for: small to medium trim projects, homeowners new to brush work.
3. Zibra Grip-n-Glide Triangle Paint Brush (2.5-inch) | $8 to $12
An affordable option that still delivers clean lines on trim and corners. The triangular handle design reduces hand fatigue. Three sides of the brush hold paint well, so you reload less often. The angled synthetic bristles work well on corners and edges where painter’s tape is normally needed.
Best for: budget-conscious DIYers, corner work, single-room projects.
4. Benjamin Moore Stinger Angle Sash (2-inch) | $15 to $20
This brush delivers a professional-level finish on detailed molding work. The beavertail handle gives superior comfort and grip. Synthetic bristles create smooth coverage with minimal streaking. The angle stays sharp even after several cleanings.
Best for: crown molding, chair rail, and detailed woodwork.
5. Proform Picasso Oval Angle Sash (2.5-inch) | $20 to $25
The oval shape provides better paint control than standard flat handles. Ultra-fine synthetic bristles leave almost no visible brush marks. Worth the extra cost if you are painting multiple rooms or touching up regularly.
Best for: large multi-room projects, homeowners who paint trim regularly.
How to Paint Trim and Baseboards the Right Way
To paint trim correctly, start by “loading” only the bottom third of the bristles with paint and tapping off the excess. Apply the paint a few inches away from the edge first to unload the bulk of the brush. Then, use a steady stroke to “cut in” toward the corner for a clean line.
The right brush gets you halfway there. Technique covers the rest.
Prepare the Surface First
Clean all trim with a damp cloth and mild soap. Grease and dust stop paint from sticking, which causes peeling later. Let it dry fully before painting.
Sand glossy trim with 220-grit sandpaper to give the new paint something to grip. Wipe away sanding dust with a tack cloth. Fill nail holes and cracks with wood filler, let it dry, then sand smooth.
Load Your Brush Correctly
Dip only the bottom third of the bristles into the paint. Too much paint causes drips. Too little forces constant reloading and uneven coverage.
After dipping, lightly tap the brush against the inside of the bucket. Do not scrape bristles against the rim. Scraping removes too much paint and damages the tips over time.
Cutting In Without Tape
Hold your brush at a 30-degree angle to the trim surface. Start 2 to 3 inches from the edge you are cutting up to, then bring the brush toward the edge in a smooth, steady stroke. This keeps excess paint away from the corner where it is harder to control.
Light, consistent pressure works better than pressing hard. Work in 3-foot sections to keep a wet edge. This prevents lap marks where dry and wet paint meet.
Point a bright work light at the surface and avoid blocking it with your body. You will catch drips and thin spots much earlier.
Two Coats Beat One Every Time
Two thin coats always produce a better finish than one thick coat. The first coat seals and shows missed spots. The second coat gives full, even coverage and a uniform sheen.
Wait at least 2 hours between coats for latex paint. Check the can for exact recoat times. Painting too soon pulls up the first layer and ruins the finish.
Use a feathering technique on the second coat. Overlap strokes slightly with light pressure at the edges to blend each pass into the previous one. This removes visible lines.
Common Mistakes to Avoid
- Overworking paint that has started to dry causes drag marks.
- Pressing too hard squeezes paint out fast and creates ridges.
- Skipping brush cleaning between coats causes clumping.
- Using a wall brush on trim creates messy edges.
- Painting in high humidity without a paint conditioner makes paint dry too fast and drag.
Climate and Paint Conditions
In warm, dry weather, paint dries faster on the brush. This makes things slower and leaves marks that can be seen. If the air is dry, add a paint conditioner like Floetrol to the latex paint. It makes the wet edge longer and keeps the brush moving smoothly over the surface.
When it’s humid, paint takes longer to dry between coats. Don’t rush and stick to the times on the can for recoating. It helps to have a fan on in the room.
How to Care for Good Quality Paint Brushes
A well-maintained brush lasts for years and dozens of projects. Proper care is the difference between a one-time tool and a long-term investment.
Clean immediately after use. Use warm soapy water for latex paint. Use mineral spirits for oil-based paint. Use a brush comb to remove dried paint from the center of the bristles and straighten the filaments. Reshape the bristles with your fingers while wet. Let the brush dry flat or hanging, never resting on the bristles. Store the brush in its cardboard jacket to keep bristles straight and prevent fraying. Never soak a brush in water for long periods as it weakens the glue holding the bristles and warps the handle.
Conclusion
Finding the best paint brush for trim comes down to three things: the right brush type, the right bristle material, and the right size. A 2 to 2.5-inch angled sash brush with synthetic bristles handles most interior trim jobs well. Invest in a brush in the $15 to $25 range and maintain it properly. It will pay back the cost in clean results and save time.
Always match bristle type to your paint. Synthetic works with latex. Natural works with oil-based. Learn the basic cutting-in technique and use thin coats. The brush does most of the work when you let it.
If you are in San Diego and prefer to skip the DIY effort entirely, San Diego Custom Painting offers professional interior painting services in San Diego. Our team handles trim, baseboards, and all detail work using the right tools and proven techniques.
FAQs About the Best Paint Brushes for Trim and Baseboards
What size brush is best for painting baseboards?
A 2.5-inch angled sash brush works best for standard baseboard trim. This size covers the surface efficiently while still giving you control for clean edges along the wall and floor. Narrower brushes slow progress. Wider ones are harder to control in tight spaces.
Should I use a natural or synthetic bristle brush for trim?
Use synthetic bristles for latex paint and water-based paint. Use natural bristles for oil-based paint or alkyd paint. Most modern interior trim painting uses latex, so synthetic is the right choice for most homeowners. Natural bristles absorb water and go soft with latex paint.
How do I prevent brush marks on trim?
Use a quality brush with tapered bristles and apply two thin coats. Hold the brush at a 30-degree angle with light, consistent pressure. Do not go back over paint that has started to dry. Feather the edges on your second coat to blend strokes and remove visible lines.
Can I use the same brush for walls and trim?
No. Wall brushes are wider and designed for coverage, not precision. Trim brushes are narrower with tapered bristles designed for detail work and clean edges. Using a wall brush on trim creates uneven lines and visible brush marks on the finished surface.
How long does a good trim brush last?
A well-maintained trim brush lasts for years and dozens of projects. Clean it thoroughly after each use, reshape the bristles while wet, and store it in its cardboard jacket. Proper care keeps bristles flexible, maintains the brush shape, and ensures consistent results every time you use it.
Is a $5 brush good enough for trim painting?
No. Cheap brushes under $10 shed bristles into wet paint, leave streak marks, and wear out fast. A $15 to $25 brush from a brand like Purdy or Wooster delivers better hold, cleaner lines, and lasts through multiple projects. The cost difference is small and the results are noticeably better.