Paintable caulk is an acrylic-based or hybrid sealant specifically engineered to fill joints, cracks, and gaps in a surface and accept paint for a seamless, finished look. This crucial prep step ensures that when you apply your paint, the entire surface from the drywall to the trim looks smooth and unified without visible gaps or cracks.
This guide, based on real-world painting experience, will cover not just the definition of paintable caulk, but also how to select the best type, achieve a professional application, and solve the frustrating problem of paint cracking over your fresh caulk bead.
Table of Contents
ToggleWhat Is Paintable Caulk?

Paintable caulk is an acrylic-based caulk used primarily to seal minor joint movement in non-structural areas, creating a clean line for painting. Unlike standard 100% silicone caulk, which repels paint and water, paintable versions are formulated with polymers that bond securely with paint. If you see visible seams, cracks, or gaps on trim, walls, or siding before painting, a paintable caulk is the exact product you need to use.
Paintable vs. Non-Paintable
Here’s what you need to know before buying anything:
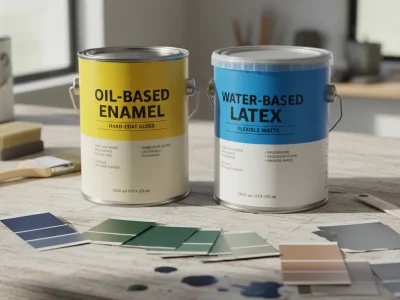
Paintable Caulk (Acrylic-Based)
- Accepts latex and oil paints
- Cleans up with soap and water
- Works on wood, drywall, and most surfaces
- Costs $3-$8 per tube
- Dries in 24 hours for painting
Non-Paintable Caulk (100% Silicone)
- Rejects all paints without a bonding primer
- Requires mineral spirits for cleanup
- Best for wet areas like showers
- Costs $5-$12 per tube
- Nearly impossible to remove once applied
I learned this the hard way on a kitchen remodel in 2010. The homeowner used white silicone caulk around their window trim. When we tried to paint it, the paint beaded up like water on a car hood. We spent three hours scraping it off with razor blades.
Never use 100% silicone on anything you plan to paint. Ever.
Types Of Caulking
Not all paintable caulks perform the same. Here’s what’s actually on the shelves and what each one does.
Basic Latex Caulk ($2-$4)
This is the cheapest option at hardware stores. It’s water-based and paintable. But here’s the problem: it shrinks.
I tested five budget caulks on trim joints last year. Within six months, four of them pulled away from the wall. The gaps came back. The paint cracked.
Basic latex works for small jobs where you’ll repaint in a year. For anything else, spend more money upfront.
Acrylic Latex Caulk ($3-$6)
This is the most common and least expensive option, often simply called painter’s caulk.
- Cleanup: Water-based, making cleanup easy.
- Drying: Fastest drying times for light paint, usually within a few hours.
- Best Uses: Interior applications only, such as small gaps between trim and walls.
- Drawback: Low flexibility. It is prone to shrinkage and cracking, especially on exterior surfaces or areas with noticeable joint movement.
Siliconized Acrylic Latex Caulk ($5-$8)
This type is a step up, blending the best qualities of both worlds. It uses the workability of acrylic with a small amount of silicone added.
- Performance: The added silicone gives it much better flexibility and adhesion, meaning it lasts longer and resists cracking in dynamic joints.
- Best Uses: Ideal for most interior and moderate exterior paintable caulk projects, like window casings and door frames. The experts at San Diego Custom Painting use this siliconized acrylic latex blend for nearly all trim and baseboard joints.
- Cost: Slightly higher than basic acrylic-latex, but the performance payoff is worth the small extra investment.
Premium Polyurethane Sealants ($8-$12)
These are the top-tier options. Polyurethane-based sealants stay flexible for decades. They’re paintable and handle larger gaps better than acrylic.
The downsides? They’re messier to work with. Cleanup requires mineral spirits. And they cost twice as much.
I use these on high-end projects or problem areas. Wood-to-brick joints. Metal-to-wood connections. Anywhere dissimilar surfaces meet and expand at different rates.
On a La Jolla coastal home last year, we used polyurethane caulk on all exterior trim. Two years later, it still looks perfect. No cracks. No shrinkage.
What About Paintable Silicone Caulk?
You’ll see tubes labeled “paintable silicone” or “silicone acrylic.” These are siliconized acrylic latex products. They’re mostly acrylic with some silicone added.
True 100% silicone is never paintable without a special bonding primer coat first. Don’t let marketing confuse you. Read the ingredients.
Best Uses for Paintable Caulk
Paintable caulk works best indoors where moisture isn’t constant. Here’s where to use it.
Interior Applications (Best Performance)
- Baseboards meeting walls
- Door casings and trim
- Window trim (interior side)
- Crown molding joints
- Wall corners and ceiling joints
- Built-in shelving gaps
These are low-stress applications. Temperature changes are minimal. Moisture exposure is low. Standard acrylic latex caulk handles all of them perfectly.
I caulk every single trim joint on interior painting jobs. It’s the difference between a $500 paint job and a $5,000 one. The lines look crisp and professional.
Limited Exterior Use
Siliconized acrylic latex works on some exterior applications:
- Window trim (if protected by overhangs)
- Door trim
- Decorative molding
- Small gaps in siding trim
But there’s a limit. Constant water exposure breaks down acrylic caulk over time. Direct sun makes it brittle. Freeze-thaw cycles cause failure.
For exterior work in San Diego, I use siliconized versions. Our mild climate helps. But in harsh winter climates, you need something stronger.
Where NOT to Use Paintable Caulk
Don’t use it in these spots:
- Bathtub and shower surrounds
- Kitchen sink backsplashes
- Toilet bases
- Horizontal siding laps (they need to drain)
- Foundation cracks
- High-movement expansion joints
These areas need 100% silicone or specialty sealants. Water and moisture resistant 100% silicone caulk is the right choice for wet areas.
Can I Use Paintable Caulk Outdoors?
Yes, but you must choose the right formulation. Basic acrylic latex caulk is not suited for outdoor exposure, as the constant expansion and contraction of siding and trim due to temperature changes will cause it to fail quickly.
For reliable paintable caulk outdoors, use a high-quality siliconized acrylic-latex or a polyurethane sealant. These products have the necessary elasticity to handle the dynamic joint movement that occurs between two different materials, like wood and masonry. When sealing exterior joints, always apply paint over the caulk to protect it from UV rays and dirt pickup.
How to Apply Caulking like a Professional Painter

Professional results come from proper technique. Here’s what I teach my crew.
Tools You Actually Need
- Quality caulk gun ($15-$20): Get one with a dripless trigger and 10:1 thrust ratio minimum.
- 5-in-1 tool ($8): For removing old caulk and debris.
- Caulk finishing tool ($5): Optional but helpful for perfect beads.
- Small bucket with wet cotton rags: For keeping your finger wet while tooling.
- Roll of paper towels: For wiping excess.
- Denatured alcohol ($10): For cleaning surfaces before caulking.
Total investment: About $50. These tools last years.
The Application Process
Step 1: Remove Old Caulk Completely
Use a 5-in-1 tool or razor blade. Dig out all the old material. You can’t caulk over failed caulk. It won’t bond.
This step takes the most time. In a typical room, I spend 30 minutes removing old caulk before applying anything new.
Step 2: Clean Everything
Wipe joints with denatured alcohol. This removes dust, oils, and residue. Let it dry for 30 minutes.
Skip this and your caulk will fail. Paint won’t stick to dirty surfaces. Neither will caulk.
Step 3: Prep Large Gaps
Gaps wider than 1/2 inch need a backer rod. This is a foam rope you push into the gap first. Then you caulk over it.
Why? Deep caulk never fully cures. It stays soft and eventually fails. Backer rod saves money and prevents failure.
Step 4: Cut and Load
Cut the tube tip at a steep 45-degree angle. Start small. You can always make the hole bigger.
Pierce the inner seal with the puncture wire on your gun. Or use a long nail.
Load the tube and advance it until the caulk reaches the tip.
Step 5: Apply at 45 Degrees
Hold the gun at 45 degrees to the joint. Aim the tip directly into the gap.
Move steadily. Keep the same speed. Don’t stop until you finish the joint.
Use steady trigger pressure. The bead should be slightly wider than the gap.
Step 6: Tool Immediately
This is the key step. Wet your finger with the damp rag. Run it along the fresh bead using firm pressure.
You’re not just smoothing the surface. You’re pushing caulk deep into the joint. That’s what creates the seal.
Tool in one smooth motion per joint. Don’t go back and forth repeatedly.
Step 7: Clean Up Excess
Wipe your finger on paper towels between passes. Remove excess from surfaces immediately.
Dried caulk is much harder to remove. Stay on top of cleanup as you work.
Step 8: Wait Before Painting
Most acrylic caulks are paintable in 24 hours. But that’s in perfect conditions (70°F, low humidity).
Premium products need 72 hours. Cold weather doubles drying times.
I wait at least 48 hours before painting caulked joints. The extra day prevents problems.
Pro Tips from 27 Years of Experience
- For baseboards: Caulk the top edge only (where it meets the wall). Never caulk the bottom edge. Floors need to breathe.
- For outside corners: These crack first. Use a slightly larger bead here. It handles movement better.
- For crown molding: Caulk both the ceiling joint and the wall joint. This creates the seamless look.
- For window trim: Don’t caulk the sill bottom edge outdoors. Water needs an escape path.
Troubleshooting Problems
- Caulk pulls away as it dries: The surface was dirty or you used low-quality caulk. Remove it and start over with clean surfaces and better products.
- Paint won’t stick: You painted too soon or used silicone by mistake. Wait longer or check what type of caulk you used.
- Caulk cracks within months: The bead was too thin or the wrong type for the application. Use more caulk and upgrade to siliconized acrylic latex.
- It’s too messy: Your hole is too big or you’re applying too much. Cut a smaller opening and use less pressure.
Need Something Painted?
You’ve got the caulking knowledge. But maybe you’d rather hire someone who’s done this 1,000 times.
San Diego Custom Painting handles both interior painting and exterior painting services in San Diego. We caulk every joint before painting. It’s included in every quote. No shortcuts.
Our team uses premium siliconized acrylic latex on all projects. We wait the full 48-72 hours before painting. And we guarantee our work for five years.
Based in San Diego, we understand coastal climate challenges. Salt air. Sun exposure. Marine layer moisture. We choose products that handle it all.
FAQs About Paintable Caulk
What’s the difference between silicone and caulk?
Caulk is generally a filler for static or low-movement cracks, most often acrylic latex caulk designed to be painted. Silicone is a highly flexible, waterproof sealant designed for high-moisture, high-movement areas (like tubs or windows) and is almost always non-paintable.
Is caulk paintable if it has silicone in it?
If a product is labeled siliconized acrylic latex, it is paintable. The small amount of added silicone enhances flexibility without preventing paint adhesion. However, a product labeled 100% silicone caulk is non-paintable and will require a special bonding primer or full removal if you want to apply paint.
How long should I wait before painting caulk in cold weather?
Cold temperatures significantly increase the drying and curing time. If the temperature is below 50 degrees Fahrenheit (around 10 degrees Celsius), you should wait a minimum of 24 hours, and ideally 48 hours. Always check the manufacturer’s label for the lowest application temperature.
What is the best caulk for painting trim and baseboards?
The consensus among professionals is siliconized acrylic-latex caulk. It offers the best combination of water cleanup, easy application, and enough flexibility to handle the minor structural movement common in window and door trim, ensuring the seal lasts longer than cheaper standard acrylic options.