Tired of looking at outdated kitchen cabinets but don’t want to spend thousands on a full replacement? You’re not alone. Many homeowners face the same challenge: wanting a fresh, modern kitchen without breaking the bank. The good news is that painting laminate cabinets is a realistic, budget-friendly solution that can completely transform your space for a fraction of the cost of new cabinetry.
Yes, you can paint laminate cabinets successfully. While the smooth, non-porous surface presents unique challenges compared to real wood, proper preparation and the right products make all the difference. This guide walks you through everything you need to know about how to paint laminate cabinets, from understanding what laminate is to avoiding common mistakes that cause paint to peel or chip. With patience and attention to detail, you can achieve professional-looking results that last for years.
Table of Contents
ToggleWhat is Laminate?
Laminate isn’t real wood. It’s a thin layer of plastic or synthetic material bonded over pressed wood or particle board. This creates a smooth, shiny surface that’s affordable and easy to clean, which is why many builders use it for kitchen cabinets.
The challenge with laminate is that it has no pores. Paint can’t soak into the surface like it does with natural wood. Instead, it sits on top, which means without proper prep work, the paint will eventually peel off. Understanding this key difference helps you approach the project correctly from the start.
Can You Paint Laminate Cabinets?
Absolutely. Painting over laminate cabinets is possible and can deliver excellent results when done right. The secret lies in three critical steps: thorough cleaning, light sanding, and using a bonding primer made specifically for slick surfaces.
If you skip these steps and try to paint directly onto laminate, you’ll likely see peeling, chipping, or bubbling within weeks or months. But when you follow the proper process, painted laminate cabinets can last 5-7 years or longer with normal use.
When Painting Laminate Cabinets Works Best
This project is ideal if your cabinet boxes and doors are structurally sound. It works best when:
- The laminate is still securely glued and not peeling at the edges.
- The surfaces are smooth without deep gouges.
- You want a high-end look without the cost of a full replacement.
If the laminate is cracking or lifting from the particle board underneath, you should repair those sections with wood glue or consider refacing instead.
What Tools and Materials You'll Need
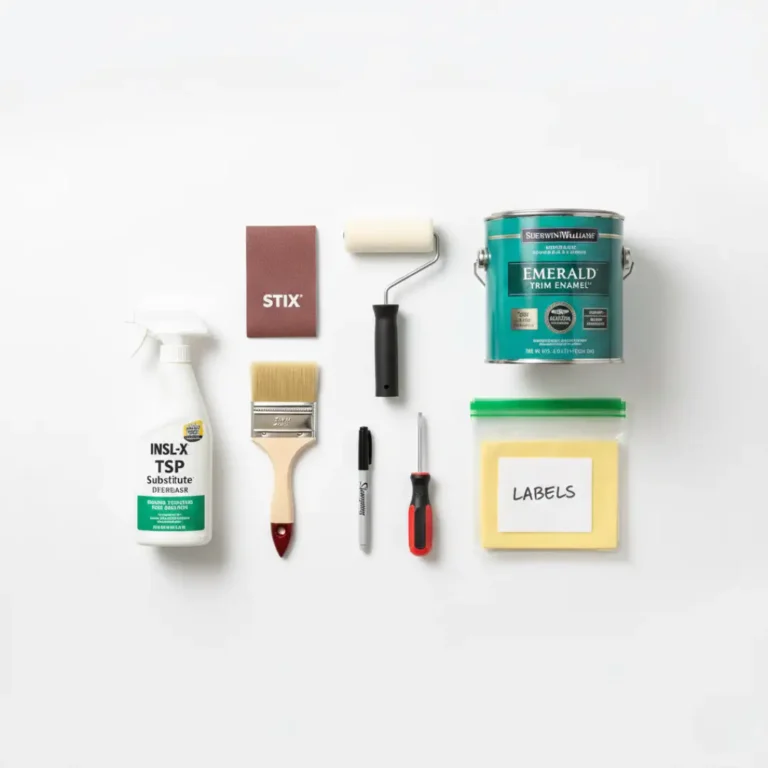
Having the right supplies before you start saves time and frustration. Here’s what you’ll need:
- Cleaning supplies: TSP substitute or heavy-duty degreaser, microfiber cloths, bucket of warm water.
- Sanding materials: 220-grit sandpaper or sanding sponges, tack cloth or denatured alcohol for dust removal.
- Primers and paint: Bonding primer (INSL-X STIX or Zinsser Bulls Eye 1-2-3), cabinet-grade enamel paint or chalk paint for laminate cabinets.
- Application tools: High-quality paintbrush for edges, foam roller or paint sprayer for flat surfaces, paint tray.
- Hardware and protection: Screwdriver, small plastic bags for screws, permanent marker for labeling, drop cloths, painter’s tape.
- Optional finishing: Clear protective topcoat for extra durability.
The best primer for painting laminate cabinets is one designed for bonding to non-porous surfaces. Regular primers won’t work well on laminate.
How to Paint Laminate Cabinets in 6 Easy Steps
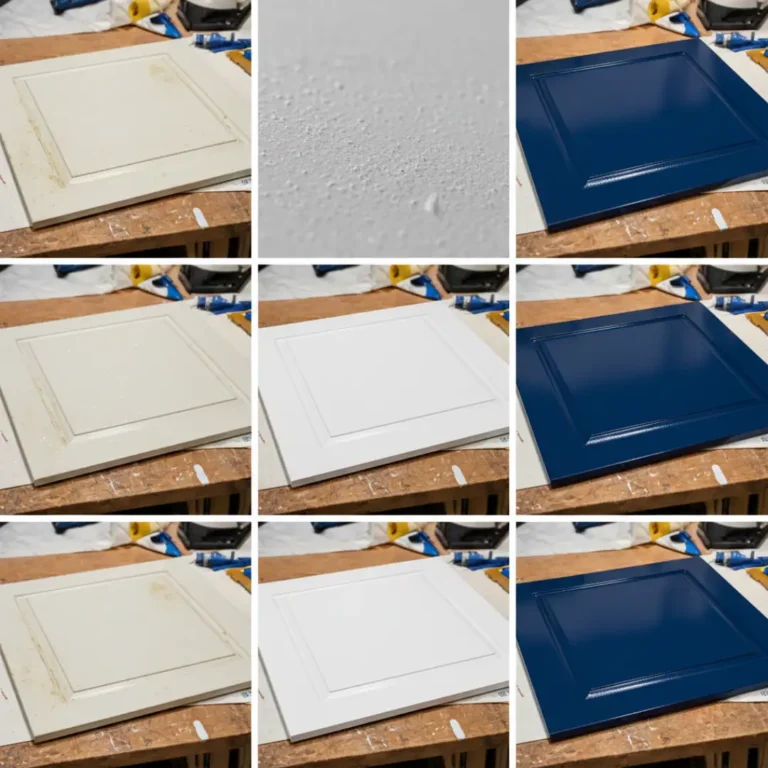
Step 1: Deep Clean All Surfaces
Kitchen cabinets collect grease, cooking oil, and grime over time. This invisible layer prevents paint from sticking properly.
Mix TSP substitute with water according to package directions. Wipe down every cabinet door, drawer front, and frame. Pay extra attention to areas near the stove where grease builds up. Let everything dry completely, which usually takes 2-3 hours.
Step 2: Remove Doors and Hardware
Use a screwdriver to take off all cabinet doors, drawer fronts, hinges, and handles. Place hardware from each door in a separate plastic bag and label it with a marker. This simple step saves hours of confusion during reassembly.
Lay doors flat on a protected work surface. Working horizontally produces better results than painting vertical surfaces.
Step 3: Sand the Laminate Surface
You’re not trying to remove the laminate, just dull the glossy finish. Use 220-grit sandpaper and sand in the direction of the grain (or in consistent circular motions if there’s no grain).
Light sanding creates tiny scratches that help primer grip the surface. After sanding, wipe away all dust with a tack cloth or rag dampened with denatured alcohol. Even small dust particles can ruin your finish.
Step 4: Apply Bonding Primer
This step is non-negotiable when painting laminate cabinets. Regular primer won’t adhere to the slick surface.
Apply your bonding primer in thin, even coats using a foam roller for flat areas and a brush for edges and details. Most projects need two coats of primer for full coverage. Let the first coat dry for 4-6 hours before adding the second.
After the final primer coat dries, lightly sand with 220-grit sandpaper to smooth any raised areas. Wipe clean with a tack cloth.
Step 5: Paint with Cabinet-Grade Enamel
Now comes the transformation. Use either enamel-based cabinet paint or chalk paint for laminate cabinets, depending on your preferred finish.
Apply the first coat thinly and evenly. Thick coats look tempting but they create drips and take forever to dry. Wait 24 hours between coats to let the paint cure properly. Most cabinets need 2-3 thin coats for full coverage and durability.
If you notice any imperfections between coats, lightly sand them smooth and wipe away dust before applying the next layer.
Step 6: Let Paint Cure and Reinstall
Drying and curing are different. Paint might feel dry to the touch after 24 hours, but it needs several days to fully harden.
Wait at least 3-5 days before reinstalling doors and hardware. During the first week, handle cabinets gently and avoid placing heavy items on shelves. Full cure time can take up to two weeks depending on humidity and temperature.
Cost Breakdown: DIY vs Professional
Painting laminate cabinets yourself costs significantly less than replacement or professional painting:
- DIY materials cost: $100-250 for an average kitchen (primer, paint, sandpaper, supplies).
- Professional cabinet painting: $1,500-4,000 depending on kitchen size.
- Cabinet replacement: $5,000-15,000+ for new laminate or wood cabinets.
The project takes 3-5 days with drying time, but you’ll save thousands compared to other options.
Tips for Painting Different Cabinet Types
- Kitchen cabinets: Remove all items first. Work in a well-ventilated area or garage if possible. Consider painting inside cabinet boxes a neutral color for a finished look.
- Bathroom cabinets: These see more moisture, so a protective topcoat is essential. Make sure ventilation is adequate during painting and drying.
- Old laminate cabinets: Check for any loose edges before starting. Glue down any lifting laminate with wood glue and clamp until dry.
How Long Do Painted Laminate Cabinets Last?
Well-prepared and quality material used repaint laminate cabinets can last five to seven or more years. There are a few factors that control longevity:
With a Bondo primer specifically for laminates. You can never brush enough coats of cabinet-grade paint. Giving it a complete cure before expecting to load it up. Cleaning with gentle, non-abrasive cleaners. Avoiding excessive moisture exposure.
Professionally painted or meticulously DIY-painted cabinets will look lovely for years.
Common Mistakes When Painting Laminate Cabinets
Skipping the primer: This is the number one reason paint fails on laminate. Always use a bonding primer.
Not cleaning thoroughly: Grease and grime prevent paint adhesion. Clean twice if your cabinets are near the stove.
Rushing drying time: Applying the next coat before the previous one fully dries causes tackiness and poor adhesion.
Using wall paint: Regular wall paint isn’t durable enough for cabinets. Use cabinet-specific paint or enamel.
Over-sanding: Laminate is thin. Aggressive sanding can damage it. Light sanding is all you need.
Painting in humid conditions: High humidity extends drying time and can cause problems. Paint on dry days when possible.
Skipping the topcoat: A clear protective finish adds years to your paint job, especially on frequently touched areas.
Troubleshooting Common Issues
- Paint feels sticky after days: Temperature or humidity might be too high. Improve ventilation and wait longer.
- Paint bubbling or peeling: Surface wasn’t clean enough or primer wasn’t used. Strip and start over with proper prep.
- Visible brush marks: Use a foam roller instead of a brush on flat surfaces. Apply thinner coats.
- Uneven color coverage: You need another coat. Don’t try to cover it in one thick application.
Maintaining Your Newly Painted Cabinets
Wash with a mild soap and water solution. Scratching some paint is out of the question, so keep off those abrasive scrubbers. Immediately wipe up spills to prevent staining. Spot fix small nicks to keep from peeling out. Add new hardware, and you have a completely new look.
Final Words
Transforming your kitchen doesn’t require a massive budget or professional help. With the right approach, painting laminate cabinets delivers impressive results that can last for years. The key is patience during prep work and allowing proper drying time between coats.
If you’re in the San Diego area and prefer professional results without the DIY hassle, San Diego Custom Painting offers expert cabinet painting services in San Diego. Our team has years of experience working with laminate, wood, and other cabinet materials to deliver flawless finishes that stand the test of time. Whether you want to tackle this project yourself or need professional help, a fresh coat of paint is one of the most cost-effective ways to love your kitchen again.
FAQs About Painting Laminate Cabinets
Can laminate cabinets be painted without sanding?
Sanding is strongly recommended. It helps primer and paint stick to the smooth surface. Skipping this step usually leads to peeling.
What’s the best paint for laminate furniture?
Cabinet-grade enamel or urethane paint works best. These paints are more durable than standard wall paint and resist chipping.
How many coats of paint do cabinets need?
Most cabinets need 2-3 thin coats after primer. More coats of thin paint always beats fewer thick coats.
Will paint peel off laminate over time?
Not if you use proper prep work and bonding primer. Poor preparation is the main cause of peeling.
Can I use regular primer on laminate?
No. Regular primers won’t bond to the laminate’s smooth surface. You must use a bonding primer specifically made for non-porous surfaces.
How long does the entire painting process take?
Plan for 3-5 days including drying time. Rushing leads to poor results.
Should I paint cabinet interiors?
It’s optional but painting the interior faces of drawers and visible shelf edges gives a more polished look.
What about painting thermofoil or melamine cabinets?
The process is similar, but verify your cabinet type first. Thermofoil can peel if overheated during sanding.