Cement board siding is one of the toughest exterior materials out there, but even tough materials need a fresh coat of paint eventually. Whether your siding is looking worn, you bought a house with a color you hate, or you’re finishing a new installation, knowing how to paint cement board siding correctly makes the difference between a job that lasts 10+ years and one that peels within two seasons.
Here’s the short answer: Yes, you can paint cement board siding yourself, and it’s easier to work with than wood. You don’t need a power washer; clean the surface, use 100% acrylic exterior paint, and put on two even layers. This article explains each process in simple terms so that you may get professional results without employing anyone.
Table of Contents
ToggleKey Takeaways
- Always use 100% acrylic exterior paint never oil-based
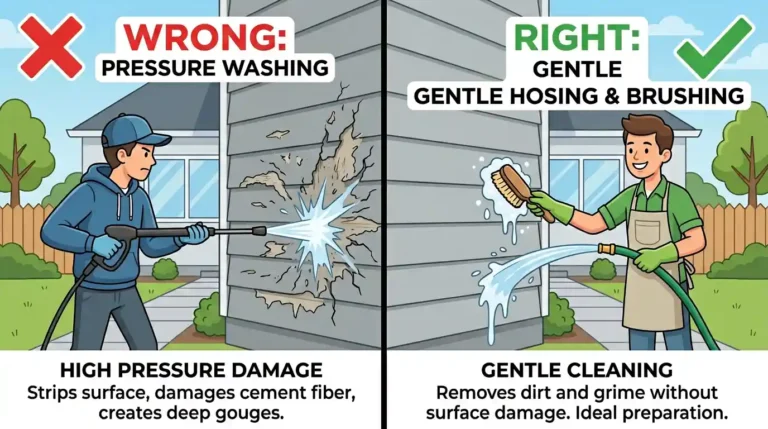
- Skip the pressure washer; a garden hose and soapy water work fine
- New, unprimed cement board does need a primer first
- Repainting voids your ColorPlus finish warranty, not your material warranty
- Two thin, even coats outperform one thick coat every time
- Ideal painting temperature is between 50°F and 90°F (10°C–32°C)
Can You Paint Fiber Cement Siding?
Yes, you can absolutely paint fiber cement siding. It accepts paint well and holds color longer than wood or vinyl. Most fiber cement products come factory-primed or pre-painted, which means prep work is minimal for repaints. With the right paint and proper prep, a fresh coat can last 10 to 15 years.
The main difference between cement board and regular wood siding is that cement board is more stable in size. Because fiber cement doesn’t expand and compress as much when the temperature changes, paint doesn’t crack or peel as quickly. That’s one of the best things about painting fiber cement siding instead of painting older wood exteriors.
According to James Hardie, repainted HardiePlank siding in moderate climates can maintain its appearance for 10–12 years, a useful benchmark to set realistic expectations for your project.
4 Things to Know Before Painting Your Fiber Cement Siding
1. Know What Finish You Currently Have
If the original finish on your siding is ColorPlus, painting it again will void the warranty on that finish. That being said, it DOESN’T cancel your full warranty on the metal. The structure of your siding stays safe, and based on the paint brand you pick, you might even get a separate paint warranty to cover it.
2. Not All Paints Work on Cement Board
This is the most common mistake homeowners make. Only use 100% acrylic latex exterior paint on fiber cement. Oil-based paints don’t bond well with the material and will crack and peel much faster. Trusted brands like Sherwin-Williams (their Emerald Exterior line) and Benjamin Moore (Aura Exterior) are specifically recommended for fiber cement surfaces.
3. Primer Matters: But Only Sometimes
If your siding is already painted or has a factory finish, you don’t need primer. If you’re working with a new, bare, unprimed cement board, apply a high-quality exterior primer first. Skipping primer on raw cement board is like painting bare drywall; the paint absorbs unevenly and the finish looks patchy.
4. Check Your Caulking First
Before you pick up a brush, inspect the caulking around windows, corners, and joints. Most James Hardie installations use color-matched caulking with a 15-year warranty. If your siding is older and the caulking is cracked or pulled away, replace it now. Painting over failing caulk just seals in a future problem.
What You'll Need to Paint Fiber Cement Siding
Tools:
- Garden hose
- Soft-bristle brush or sponge
- Bucket with mild soapy water
- 120–150 grit sandpaper (lightly scuff if needed)
- Paintbrushes (angled sash brush for edges)
- 3/8″ nap roller for flat sections
- Airless paint sprayer (optional, but faster for large areas)
- Painter’s tape and drop cloths
- Caulk gun and paintable exterior caulk
Materials:
- 100% acrylic latex exterior paint (satin or low-sheen finish recommended)
- Exterior primer (only for bare/unprimed surfaces)
- Replacement caulking if needed
Budget roughly $200–$600 for a DIY paint job on an average-sized home exterior, depending on paint brand and square footage. Professional labor typically runs $1,500–$4,000 for the same job, a useful comparison to validate the DIY effort.
How to Paint Cement Board Siding: Step-by-Step Instructions
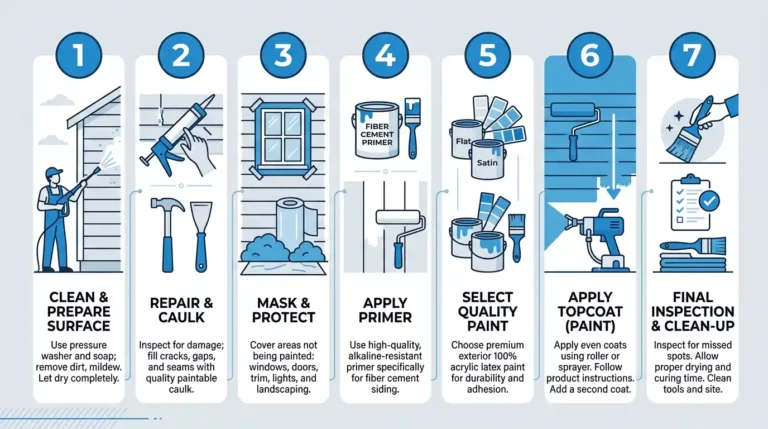
Step 1: Clean the Surface
Use a garden hose, not a pressure washer, to rinse the whole surface. High-pressure water can hurt the texture of the surface and leave marks that show through the last layer of paint. Use a pail of warm, soapy water and a soft sponge or brush to get rid of filth, grime, or mildew that won’t come off.
Let the siding dry all the way. Most of the time, you only need to wait 24 hours for the paint to cure before you can start.
Step 2: Sand Lightly (If Needed)
If the existing paint is in rough shape minor peeling or a chalky surface lightly sand those areas with 120–150 grit sandpaper. You’re not stripping the surface, just giving the new paint something to grip. Wipe off any dust with a dry cloth after sanding.
Step 3: Repair Caulking and Gaps
Apply fresh paintable exterior caulk around windows, trim, and corners where the old caulk has cracked or pulled back. Smooth it with a wet finger and let it cure according to the manufacturer’s instructions before painting over it. This step protects against moisture getting behind the siding.
Step 4: Apply Primer (New or Bare Board Only)
If you’re working on a new, unprimed cement board, apply one coat of exterior primer. Use a brush for edges and a roller for flat sections. Let it dry fully before moving on. Pre-painted or factory-finished siding can skip this step entirely.
Step 5: Apply the First Coat of Paint
Use an angled brush for edges, corners, and around trim. Switch to a 3/8″ nap roller for large flat sections. If you’re using an airless sprayer for speed, follow up with a brush to back-brush the paint into the surface this improves adhesion.
Apply thin, even coats. Thick coats take longer to dry and fade unevenly over time.
Step 6: Apply the Second Coat
Wait for the first coat to dry completely, check the paint can for specific dry times, usually 4–6 hours in good conditions. Then apply the second coat the same way. Two even coats give you better coverage, better color depth, and longer-lasting protection than one heavy coat.
Step 7: Inspect Every Angle
Walk around the house and look at the siding from different angles. This is especially important for shake or board-and-batten styles, where it’s easy to miss edges and grooves. Before the paint dries completely, touch up any areas that are thin.
Tip: Lap siding is easier to paint evenly than shake siding due to its smooth, flat surface. If you have shake-style fiber cement, allow extra time for edge coverage.
Common Mistakes to Avoid When Painting Fiber Cement Siding
- Using a pressure washer: it damages the surface texture
- Applying paint on a hot, sunny day: paint dries too fast and shows brush marks
- Painting in cold weather below 50°F: paint won’t cure properly
- Skipping the second coat: single-coat jobs fade and show unevenness within 2–3 years
- Using oil-based paint: it doesn’t bond well with fiber cement and cracks faster
- Ignoring caulk repairs: moisture gets in and causes bigger problems down the road
Maintenance Tips for Painted Fiber Cement Siding
Painted fiber cement siding is genuinely low-maintenance. A simple garden hose rinse once or twice a year keeps it clean and looking sharp. Avoid harsh chemicals or abrasive cleaners; they strip the paint finish.
Check your caulking every two to three years. If you catch a little crack early, you won’t have to replace all of the caulk later. As soon as you see any chips or scratches, fix them. Small repairs only take 10 minutes and stop bigger paint problems.
With proper care, your paint job should hold up 10 to 12 years before a full repaint is needed.
Get a Beautiful Exterior With SD Custom Painting
If this feels like more than you want to take on yourself, that’s completely fair. SD Custom Painting handles all of this from start to finish, including surface prep, caulk repair, priming, and the full two-coat paint application. As a trusted provider of exterior painting services in San Diego, the team knows exactly how fiber cement and cement board siding behave in the local climate, and how to get results that actually last.
Whether it’s painting Hardie siding, lap siding, board and batten, or shake-style fiber cement, SD Custom Painting has the experience to get it done right the first time.
FAQs About Fiber Cement Siding Painting
Do I need a primer for fiber cement siding?
Only if it’s bare, unprimed cement board. Factory-painted or previously painted siding doesn’t need primer as long as the surface is clean and in good condition.
What’s the best paint for cement board siding?
Use 100% acrylic latex exterior paint. Sherwin-Williams Emerald Exterior and Benjamin Moore Aura Exterior are both highly recommended for fiber cement surfaces.
Will repainting my James Hardie siding void the warranty?
Repainting voids the 15-year ColorPlus finish warranty but does NOT affect the full material warranty your siding stays covered.
How many coats of paint does a cement board need?
Two coats. Always. One coat fades unevenly and won’t give you the protection or the color depth you need.
Can I use a paint sprayer on fiber cement siding?
Yes, an airless sprayer works well and speeds up the job. Always back-brush the sprayed paint into the surface for better adhesion and an even finish.
What sheen level should I use for exterior cement board siding?
A satin or low-sheen finish works best. It’s durable, easy to clean, and doesn’t show surface imperfections the way a high-gloss finish does.