You just painted your wall and stood back to see those unsightly lines that are still there. Even if you think you did everything perfectly, paint streaks come to practically every DIYer. This is annoying, but the good news is that you can remedy it without hiring a professional or painting the whole room again.
In this guide, we’ll walk you through exactly how to fix paint streaks on walls step by step. We have a simple and useful answer for any case, whether your paint is still wet or completely dry. We’ll also talk about what makes paint streaky in the first place, so that it doesn’t happen again when you paint again.
Table of Contents
Toggle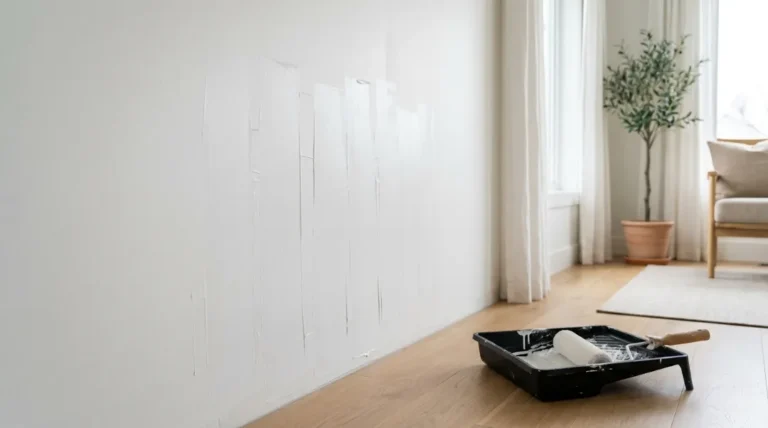
Key Takeaways
- Paint streaks are caused by uneven roller pressure, dry edges, overloaded brushes, or poor-quality paint
- Wet streaks are easier to fix than dried ones act fast if you catch them early
- Lightly sanding + repainting is the most reliable fix for dried paint streaks
- Paint finish type (matte, satin, gloss) affects how visible streaks are and how to fix them
- Prevention is simpler than fixing the right tools and technique make all the difference
What Are Paint Streaks and Why Do They Appear?
Paint streaks are uneven, visible lines or bands left on a wall surface after painting. They appear when paint isn’t applied consistently, leaving some areas with more paint buildup than others. Both rollers and brushes can cause them depending on your technique and tools.
The streak of paint you see is essentially the edge of one paint pass not blending properly into the next. If you don’t overlap your strokes evenly, you’ll see lines, just like when you clean a floor. The same idea works for painting walls.
What Causes Paint Streaks When Painting?
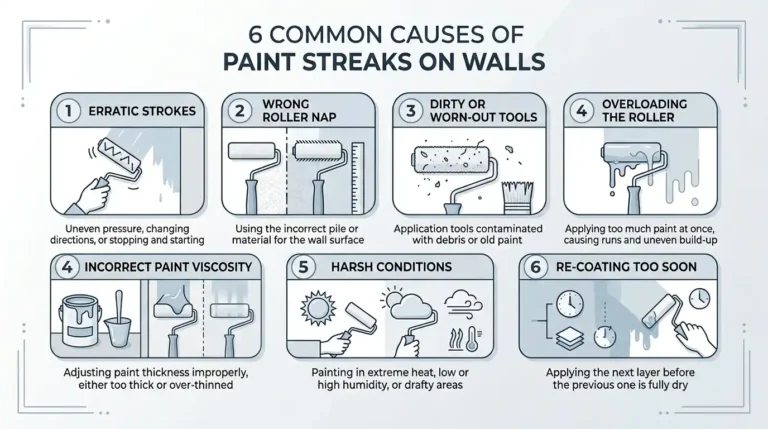
The first step to correcting and stopping paint streaks is to figure out why they happen. These are the most common reasons:
- Uneven roller pressure is the biggest culprit. When you press harder on one side of the roller, that edge deposits more paint, leaving a dark line. Always apply consistent pressure from ceiling to floor.
- Not keeping a wet edge causes lap marks. When part of your paint dries before you overlap the next section, the dried edge builds up a ridge. This creates those subtle but visible lines, especially in natural light.
- Overloaded or dry brush/roller makes a big difference too. Too much paint causes drips and heavy streaks. Too little paint leaves patchy, dry marks. Load your roller halfway in the tray and roll off the excess on the tray’s ridged surface.
- Poor-quality tools make the job harder than it needs to be. Cheap rollers shed fibers, apply unevenly, and wear out mid-project. A quality synthetic brush and a good roller cover are worth every penny.
- Unprepared wall surfaces are often overlooked. Dust, grease, or old bumps on the wall stop paint from adhering evenly. That’s why dark patches on painted walls often come from skipping the prep stage.
- Low-quality or unmixed paint can also cause streaking paint. If the pigments and binders aren’t properly mixed, coverage becomes inconsistent. Always stir your paint thoroughly before and during use.
According to painting industry data, nearly 65% of DIY paint jobs require touch-ups due to improper surface prep or technique errors.
How to Fix Paint Streaks on Walls: Step-by-Step Solutions

The approach depends on whether your paint is still wet or has completely dried. It’s easier to restore wet streaks than dried ones, which need to be sanded lightly before being painted again. In either case, neither remedy requires taking off the full wall.
Fixing Wet Paint Streaks (Act Fast)
If you catch the paint streaks while the paint is still wet, here’s what to do:
- Don’t let it dry. Keep working immediately.
- Re-roll the area using a clean, lightly loaded roller in smooth ceiling-to-floor strokes.
- Use the W-pattern technique to roll in a wide “W” shape first, then fill it in with straight vertical strokes. This distributes paint evenly across the surface.
- Keep a wet edge at all times. Work in sections no wider than 3 to 4 feet so the edge never dries before you overlap it.
- Backroll the section from ceiling to floor in one smooth pass to even out any remaining lines.
Fixing Dried Paint Streaks (The Sand-and-Repaint Method)
This is the most reliable method for fully dried paint streaks:
What you’ll need:
- 120-grit sandpaper (for heavier ridges)
- 220-grit sandpaper (for smoothing)
- Sanding block
- Damp sponge or cloth
- Primer (if switching colors or dealing with blotchy coverage)
- Matching interior paint
- Quality synthetic brush or roller
Steps:
- Sand the streaked area with 120-grit sandpaper using a sanding block. Work in a circular motion until the ridge or bump is no longer felt by touch.
- Switch to 220-grit sandpaper and go over the same area to remove any scratches from the coarser grit.
- Feather the edges outward from the sanded spot. This blends the repaired area into the surrounding paint so there’s no visible border.
- Wipe the area clean with a damp sponge. Remove all dust and let it dry fully — usually 20 to 30 minutes.
- Apply primer if needed. If you’re painting a different color or the sanded area looks blotchy, a thin primer coat sets you up for even coverage. Skip it if you’re using the same color.
- Apply a thin first coat of your matching paint using a brush or roller. Let it dry for 2 to 4 hours.
- Add a second coat and feather the edges into the surrounding wall to blend seamlessly.
- Finish with a light third coat over a slightly wider area to make the repair invisible.
Fixing Streaks by Paint Finish Type
This is something most guides skip entirely but paint finish affects how streaks look and how to fix them.
- Matte paint: More forgiving. Streaks are less visible but absorb touch-up paint differently. Sand lightly and repaint a full section for the cleanest result.
- Satin and eggshell paint: The most common wall finish. Follow the sand-and-repaint method above. Feathering edges is key here.
- Semi-gloss and gloss paint: Streaks are very visible under light. These finishes require careful sanding and at least two to three thin coats for a smooth, even sheen.
Tip: A painting contractor tip worth mentioning always test your touch-up paint on a small hidden area first. Paint can shift slightly in sheen or color after drying, and you want to catch that before repainting a large section.
Lighting and Humidity
Most tutorials don’t remember that the surroundings in your room are just as important as your brush. That part will dry faster than the remainder if the AC is blowing directly on a wall. This uneven drying is one of the main reasons why my paint stains.
You should also evaluate your work using “critical lighting.” Put a flashlight or work lamp at an angle against the wall. This shows you shadows and ridges that you can’t see from the front. It’s a mistake to fix these when the paint is still a little wet; you should always wait for the dry cycle.
When to Spot Fix vs. Repaint the Entire Wall
This is a question neither top-ranking article answers but your readers are definitely asking it.
Spot fix when:
- Streaks cover less than 20% of the wall
- The paint color and sheen are an exact match
- The streaks are isolated to one section
Repaint the full wall when:
- Streaks run floor to ceiling across the entire surface
- You’ve touched up multiple times and blending isn’t working
- Dark patches on painted walls keep reappearing despite fixes
- The paint finish is high-gloss and the repair is very visible
Best Tips to Prevent Paint Streaks Before They Start
Fixing paint streaks is straightforward, but not having to fix them is better. These tips work whether you’re painting for the first time or trying to avoid repeating a frustrating experience.
- Prep your wall properly. Clean the surface with a damp cloth and let it dry. Sand down any old bumps, cracks, or previous streaks. A smooth surface is the foundation of a smooth finish.
- Use the right tools. A 9-inch roller with a quality roller cover and a synthetic angled brush are your two most important tools. Avoid cheap brushes; they leave bristle marks and apply paint unevenly.
- Load your roller correctly. Fill your paint tray with about half an inch of paint. Dip the roller halfway, then roll off the excess on the ridged section of the tray. An overloaded roller drips. A dry roller streaks.
- Keep a wet edge throughout. Never let the edge of your painted section dry before overlapping the next. Work in manageable sections of 3 to 4 feet at a time.
- Always backroll. After painting a section, do one final pass from ceiling to floor with light pressure. This evening out step is what professional painters do every time and it’s the single biggest difference between a streaky finish and a smooth one.
- Apply two thin coats, not one thick coat. One thick coat is the most common DIY mistake. Two thin coats, with proper drying time in between, always produce a cleaner, more even finish.
Say Goodbye to Streaks with SD Custom Painting Company
Sometimes you can’t fix a paint job yourself. If you’ve tried these things and your painted walls still have uneven coverage, lap marks, or dark patches that won’t go away, it might be time to call in a pro.
SD Custom Painting offers reliable interior and exterior painting services in San Diego with a clean, streak-free finish every time. Our team handles everything from surface prep to final coat, so you get results that last without the frustration.
Whether it’s one room or a full home, we use premium-quality tools, proper technique, and years of hands-on experience to get the job done right. Reach out to SD Custom Painting today for a free consultation.
Final Thoughts
Paint streaks are one of the most common wall painting problems, but they’re also one of the most fixable. Knowing how to fix paint streaks on walls comes down to two things: acting fast when paint is wet, and using the sand-and-repaint method when it’s dry.
It’s not pricey paint that makes a smooth finish. It’s all about getting ready, having the correct tools, and using the same method every time. If you do those three things perfectly, streaking paint will be a problem you won’t have to deal with very often.
FAQs About Paint Streaks
Can I fix paint streaks without repainting the whole wall?
Yes, in most cases. If streaks cover a small area, lightly sand the affected section, feather the edges, wipe clean, and apply one to two thin coats of matching paint. You only need to repaint the full wall if the streaks are widespread or the finish is high-gloss.
Why is my paint streaking even with a roller?
Streaking with a roller is usually caused by uneven pressure, an overloaded roller, or not keeping a wet edge. Try rolling in a W-pattern and finishing with smooth ceiling-to-floor strokes using lighter, even pressure.
How long should I wait between coats to avoid streaks?
Wait 2 to 4 hours between coats for most latex interior paints. Check your paint label for exact guidance. Painting over a still-tacky coat is one of the fastest ways to create new streaks.
Does paint type affect streaking?
Yes. High-gloss and semi-gloss finishes show streaks far more than matte or eggshell. If you’re painting with a darker or glossier paint, use a primer first and apply at least two thin coats.
What’s the best way to fix dark patches on a painted wall?
Dark patches on painted walls usually mean the primer was skipped or the surface wasn’t properly prepped. Sand the area smooth, apply a coat of primer, let it dry fully, then repaint with two thin, even coats.