It may seem like a small thing to pick the correct sealant for your kitchen or bathroom. But choosing the wrong one might cause mold or water damage in just a few months. Most homeowners have to choose between two typical options: grout vs caulk. They are not the same thing, even though they both fill up spaces between tiles.
You should have a home that stays lovely and dry without needing repairs all the time. This guide covers everything you need to know about using these materials correctly in your renovation. We will talk about the prices, how long they last, and where each one should go.
Table of Contents
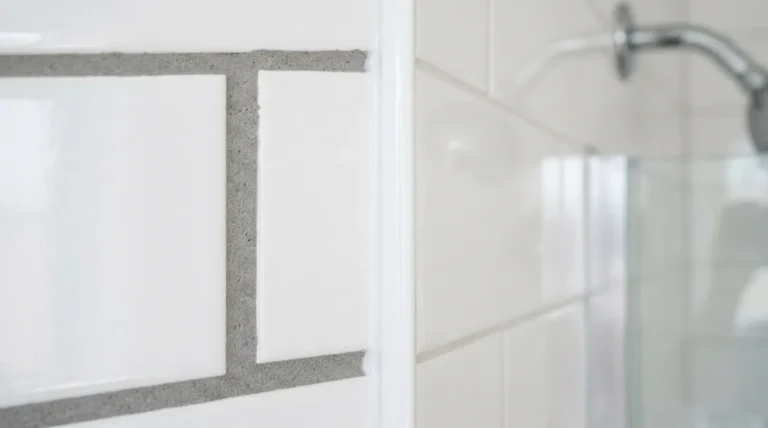
ToggleGrout is a rigid, cement-based filler used to fill stable gaps between tiles on floors and walls. Caulk is a flexible, waterproof sealant used where two different surfaces meet, such as a bathtub and a wall. Grout provides structural strength, while caulk allows for movement and prevents leaks.
What Is Grout?
Grout is a cement-based filler used between tiles. It hardens completely after curing, creates a rigid bond, and keeps tiles from shifting. Most grout is a mix of cement, sand, and water. It is not flexible once dry.
Grout does two things at once. First, it keeps tiles in place on the substrate. Second, it keeps water, dirt, and other debris from getting to the material underlying. Without grout, even a perfectly installed tile floor can loosen over time.
Types of Grout
Choosing the right type of grout matters as much as knowing when to use it.
Sanded Grout
Sanded grout is the most common type. It contains fine sand particles that prevent the mixture from shrinking in wider joints. Use sanded grout for any tile joint wider than 1/8 inch. It is ideal for floor tiles and high-traffic areas. A 10-pound bag costs roughly $8 to $15 and covers about 50 square feet.
Unsanded Grout
Unsanded grout has a smooth texture. It works best for narrow joints under 1/8 inch wide. Use it on delicate tile surfaces like polished marble or glass tiles, since sand can scratch these materials. It costs about $12 to $20 per bag but can crack under heavy foot traffic, so avoid it on floors.
Epoxy Grout
Epoxy grout is the top-performing option. It mixes a resin and hardener instead of cement. Epoxy grout resists stains, moisture, chemicals, and cracking without ever needing a sealer. It is a popular choice in commercial kitchens, pools, and wet showers. Expect to pay $40 to $80 per bag, but it can last 30 or more years with almost no maintenance.
Uses for Grout
Grout belongs in one specific place: between tiles. Use it on bathroom floors, shower walls, kitchen backsplashes, and ceramic tile caulk transition areas on interior walls. Any space between two tiles needs grout, not caulk. The joint width tells you which type to use. Grout is never meant for corners, tub edges, or any joint that will flex or move over time.
What Is Caulk?
Caulk is a flexible sealant made from silicone, acrylic, or latex. Unlike grout, it stays slightly soft after curing. This flexibility lets it stretch and compress as surfaces expand, contract, or settle without cracking.
A tube of caulk costs between $3 and $12 and is ready to use. No need to combine. Put it in a caulking gun, squeeze out a smooth bead, and form it with a wet finger or tool. It takes around 30 minutes to peel over, but it shouldn’t be exposed to water for 24 hours.
Types of Caulk
Silicone Caulk
Silicone caulk offers the best water resistance. It bonds strongly to glass tiles, tile, metal, and porcelain. Use it anywhere with direct water contact, like showers, tubs, and sinks. The downside is that you cannot paint over pure silicone. It costs $5 to $12 per tube.
Acrylic Latex Caulk
Acrylic Latex caulk (also called painter’s caulk) dries fast and accepts paint. It works well in dry areas like baseboards and window trim. It is not waterproof, so it does not belong in showers or near tubs.
Acrylic Latex Silicone Caulk
This caulk is a hybrid. It combines the paintability of acrylic with the water resistance of silicone. This is a solid all-around option for interior bathroom and kitchen projects where you want both features.
Elastomeric Sealant
Elastomeric sealant stretches significantly without tearing. It is best for exterior joints, roofing, and surfaces that shift frequently with temperature changes.
Uses for Caulk
Use caulk wherever two different materials meet or wherever a joint will experience movement. The most common spots are the joint between tile and tub, shower corners where two tile walls meet, around sinks and countertops, and along the base of a tile backsplash where it meets the countertop. Grout vs caulk in shower installations is a question with one clear answer: always caulk the corners and the tub-to-tile joint.
Grout vs Caulk: Key Differences
Understanding the difference between grout and caulk comes down to five factors: material, flexibility, waterproofing, where you use them, and how long they last.
Factor | Grout | Caulk |
Material | Cement, sand, water | Silicone, acrylic, or latex |
Flexibility | Rigid when cured | Stays flexible |
Waterproof | Porous, needs sealing | Non-porous, waterproof |
Best Location | Between tiles | Corners, tub edges, joints |
Lifespan | 10 to 30+ years | 3 to 10 years |
Cost (approx.) | $8 to $80 per bag | $3 to $12 per tube |
Maintenance | Seal every 1 to 2 years | Inspect and replace as needed |
The most critical difference is flexibility and waterproof performance. Grout is rigid, which is perfect for holding tiles in place. Caulk is flexible and waterproof, which is perfect for sealing moving joints. Neither product substitutes for the other.
Common Mistakes Homeowners Make
These mistakes cause most tile failures. Knowing them upfront saves time and money.
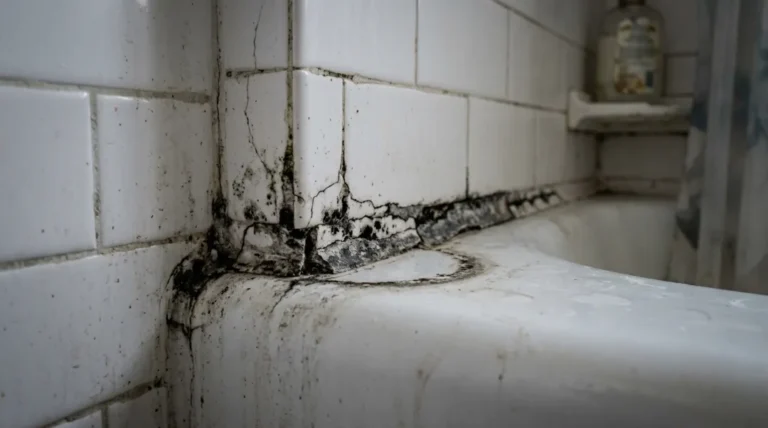
Using grout in shower corners. Corners flex slightly as the building settles. Rigid grout cracks in these spots within months. Always use caulk in corners.
Applying caulk over old grout. This traps moisture underneath and creates a breeding ground for mold and mildew. Remove old material completely before applying anything new.
Caulking over old caulk. New caulk will not bond properly to old caulk. Scrape every bit out first, clean the joint with rubbing alcohol, let it dry, then apply fresh caulk.
Grouting the tub-to-tile joint. This is one of the most common tile mistakes. The tub expands and contracts with temperature. Grout cannot handle that movement. Use silicone caulk here every time.
Skipping grout sealer. Cement-based grout is porous and will absorb water, soap, and stains without a sealer. Apply a penetrating sealer after the grout cures and reseal every one to two years.
Not color-matching caulk to grout. Most manufacturers sell caulk that matches their popular grout colors. A mismatched joint line stands out immediately. Bring your grout color name to the store when buying caulk.
Can You Use Grout and Caulk Together?
Yes. Most tile projects need both materials. They work in different locations and serve different purposes. Grout goes between the tiles. Caulk goes in corners, at tub edges, and anywhere two surfaces meet at an angle.
The rule is simple: grout for tile-to-tile, caulk for tile-to-other. In a standard shower installation, the tiles themselves are grouted. The four vertical corners use caulk. The bottom joint where the tile meets the tub or shower pan uses caulk. Follow this rule and the installation will hold up for years.
Always let the grout cure fully before caulking the adjacent areas. Most grouts need 24 to 72 hours. Caulking too early can introduce moisture that weakens the grout bond and slows curing. Clean all surfaces with rubbing alcohol before applying caulk for the best adhesion.
Grout or Caulk Between Tub and Tile?
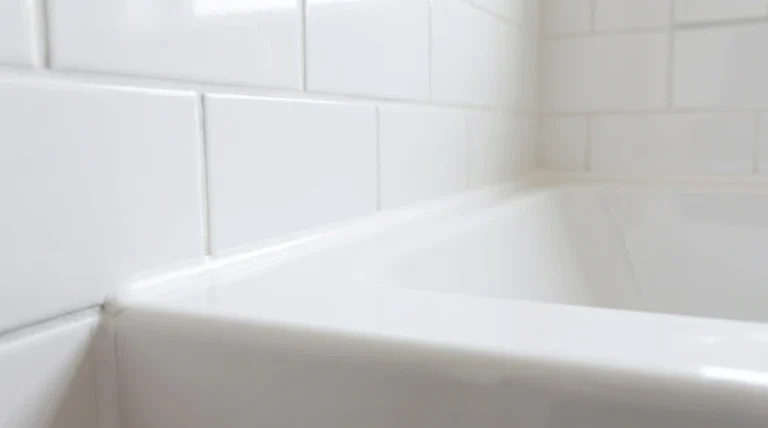
Always use caulk between tub and tile, not grout. The tub expands when filled with hot water and contracts when it cools down. This constant movement will crack grout within weeks. Silicone caulk flexes with the tub and maintains a waterproof seal throughout these changes.
This applies whether you ask grout or caulk between tub and tile or grout or caulk for shower floor edges. Anywhere the tile meets a fixture, a drain, or a different surface material, caulk is the correct answer. Use 100% silicone caulk in these areas for maximum durability and mold resistance.
How Grout and Caulk Are Stored
Storage affects performance. This section is something most tile guides skip entirely.
Storing Grout: Keep unopened bags in a cool, dry location off the floor. Humidity in the air can start the curing process prematurely, turning your powder into hard lumps. Once mixed, grout has a working time of 30 to 90 minutes. You cannot save leftover mixed grout. Plan your quantities carefully.
Storing Caulk: Sealed tubes last one to two years if stored at room temperature. Check the date code before buying. Once opened, the caulk dries out fast. Seal the tip tightly with a nail or screw cap after each use. Never store caulk in a hot garage or cold shed. If the caulk is thick and hard to squeeze out, it has expired. Throw it out and buy fresh.
When to DIY and When to Call a Professional
Some tile jobs are straightforward DIY projects. Others need experienced hands to avoid expensive mistakes.
Good DIY projects: Recaulking a tub or sink is a beginner-friendly task. It takes one to two hours and costs under $20 in materials. Grouting a small kitchen backsplash under 25 square feet is also manageable for a patient first-timer with proper tools.
Call a professional for: Full bathroom remodels, large shower pan installations, floor tile projects over 100 square feet, and any job requiring waterproofing membranes or substrate repair. One wrong step in these jobs can cause hidden water damage that destroys floor joists and subfloors.
If you are in San Diego and need professional tile work done right the first time, San Diego Custom Painting offers complete bathroom and kitchen tile installations. With 27 years in coastal climates where moisture challenges every material, our team uses epoxy grout in all wet areas and guarantees grout and caulk work for two years. We also handle home remodeling services in San Diego for complete bathroom renovations from tile to paint.
Real Cost Breakdown
Here are actual material costs to help you plan your project budget.
- Sanded grout: $8 to $15 per 10-pound bag (covers about 50 sq ft)
- Unsanded grout: $12 to $20 per bag
- Epoxy grout: $40 to $80 per bag (no sealing needed, lasts 30+ years)
- Silicone caulk: $5 to $12 per tube (covers about 30 linear feet)
- Acrylic latex caulk: $3 to $8 per tube
- Grout sealer: $10 to $25 per bottle
- Professional grouting labor: $3 to $8 per square foot
- Professional caulking labor: $1 to $3 per linear foot
A full 100-square-foot bathroom tile project typically costs $300 to $800 for grout work and $50 to $150 for caulk application when hiring a professional.
Final Thoughts
The grout vs caulk decision is not complicated once you know the rule. Grout goes between tiles. Caulk goes wherever tiles meet something else, especially in corners and at tub edges. Use both in every tile installation, and use the right type of each for the specific location.
Check your caulk twice a year for shrinking, cracking, or mold. Seal your grout once a year in wet areas. Small problems caught early never become expensive repairs. Take care of both materials and they will protect your tile work for years.
FAQs About Grout vs Caulk
Can you use caulk instead of grout between tiles?
No. Caulk lacks the strength to hold tiles in place and will shrink over time, causing tiles to loosen and allowing water behind them. Always use proper grout between tiles and reserve caulk for corners and expansion joints.
Is grout or caulk more waterproof?
Caulk is more waterproof. Cement-based grout is porous and absorbs water without sealing. Silicone caulk creates a completely waterproof barrier. For direct water exposure, caulk wins every time.
How long does each material last?
Properly sealed cement grout lasts 10 to 20 years. Epoxy grout can last 30 or more years without sealing. Bathroom caulk in constant contact with water typically lasts 3 to 5 years. Regular inspections help you catch failures early.
Should you grout or caulk shower corners?
Always caulk shower corners. Corners experience movement as the structure settles. Rigid grout cracks in these spots. Silicone caulk stays flexible and maintains a watertight seal even as the walls shift slightly.
Can you put a new caulk over the old caulk?
No. The new caulk will not bond to the old caulk and will peel away quickly. Remove all old material with a utility knife, clean the joint with rubbing alcohol, let it dry completely, and then apply fresh caulk from scratch.
What is the best caulk for shower tiles?
100% silicone caulk is the best choice for shower tiles. It is waterproof, mold-resistant, and bonds strongly to tile, glass, and metal. Choose a color that matches your grout for a clean, finished look.
How often should you replace bathroom caulk?
Inspect bathroom caulk every six months. Replace it when you see shrinking, cracking, peeling, or mold growth that will not clean off. Most bathroom caulk needs replacing every three to five years depending on conditions.
What happens if you grout over the tub-to-tile joint?
The grout will crack within weeks. The tub expands and contracts with temperature changes. Rigid grout cannot handle this movement. Once cracked, water seeps behind the tiles and can cause serious structural damage over time. Always use caulk at this joint.