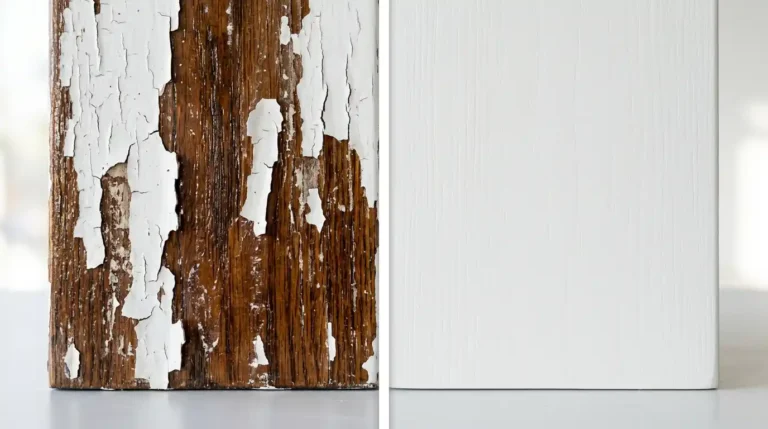
Yes, you can paint over varnished wood. You don’t need to strip the old finish down to bare wood. You do need to prep the surface the right way, or the paint will peel, chip, or bubble within months. That’s the part most guides skip, and it’s the part that actually decides whether your project holds up.
If you’re staring at an old varnished dresser, a set of cabinets, or trim that’s seen better days, you’re probably worried about wasting money on paint that won’t stick. That’s a fair worry. Varnish is glossy and smooth by design, which means paint has almost nothing to grip onto unless you prepare it correctly. This guide walks you through exactly how to paint over varnished wood so it lasts, using the same steps a working painting crew uses on real jobs, not a shortened version made for clicks.
Table of Contents
ToggleCan You Paint Over Varnished Wood?

Short answer: yes, and you don’t have to remove the varnish completely.
What you do have to do is break the surface so primer and paint have something to hold onto. Varnish creates a hard, sealed layer that’s built to resist moisture, scratches, and wear. That’s great for protecting wood. It’s terrible for paint adhesion. Paint needs a slightly rough, clean surface to bond to. A shiny varnished surface is basically the opposite of that.
This is why some people paint straight over varnish without prep and end up with paint peeling off in sheets a few weeks later. It’s not that painting over varnish doesn’t work. It’s that they skipped the two steps that make it work: dulling the shine and using the right primer.
You also don’t need to guess which type of varnished item this applies to. It works the same way whether you’re dealing with:
- Furniture (dressers, tables, chairs)
- Cabinets (kitchen, bathroom, built-ins)
- Trim and doors
- Wood paneling
The wood underneath the varnish matters a little too. Oak, for example, has natural tannins that can bleed through paint if you use the wrong primer. We’ll cover that below.
Do You Always Need to Sand?
Not always.
Light sanding is still the safest choice because it helps the primer grip the surface. A quick scuff with 150 to 220-grit sandpaper is usually enough. You are not trying to remove the varnish. You are simply taking away the glossy shine.
For some projects, painting over varnished wood without sanding is possible if you use a quality liquid deglosser and a bonding primer designed for glossy finishes. This approach can save time, but it only works when the varnish is still in good condition and free of wax, grease, or damage.
If you are painting kitchen cabinets, stair railings, or furniture that gets heavy daily use, light sanding remains the better option because it gives the paint system a stronger grip.
Why Paint Fails on Varnished Wood
Many people think they bought the wrong paint when the finish starts peeling. In reality, the problem usually starts before the paint ever touches the surface.
Understanding why paint fails helps you avoid the same costly mistakes.
Glossy Varnish Prevents Good Adhesion
Varnish seals the wood and creates a smooth coating. While this protects the wood, it also gives paint very little to hold onto.
Without proper surface preparation, the paint sits on top instead of bonding to the finish.
Dirt, Grease, and Furniture Polish
Wood furniture and cabinets collect more than dust over time.
Cooking oils, fingerprints, wax polish, silicone sprays, and cleaning products leave behind a thin layer that blocks paint adhesion. Even the best primer cannot stick well to grease.
Always clean the surface before sanding or priming.
Skipping the Primer
One of the biggest mistakes in painting varnished wood is applying paint directly over the old finish.
A bonding primer acts like a bridge between the varnish and the paint. It seals the surface, improves adhesion, and reduces the chance of peeling or chipping later.
Thick Paint Coats
Heavy coats may look faster, but they create problems.
Thick layers dry slowly, trap moisture, and increase the risk of cracking or bubbling. Several thin coats always produce a stronger and smoother finish.
Painting Over Loose Varnish
If the old varnish is lifting away from the wood, new paint cannot fix it.
Loose or damaged areas should be scraped, repaired, and sanded before applying primer. Otherwise, the paint will eventually come off along with the failing varnish underneath.
Preparing Varnished Wood Before Painting
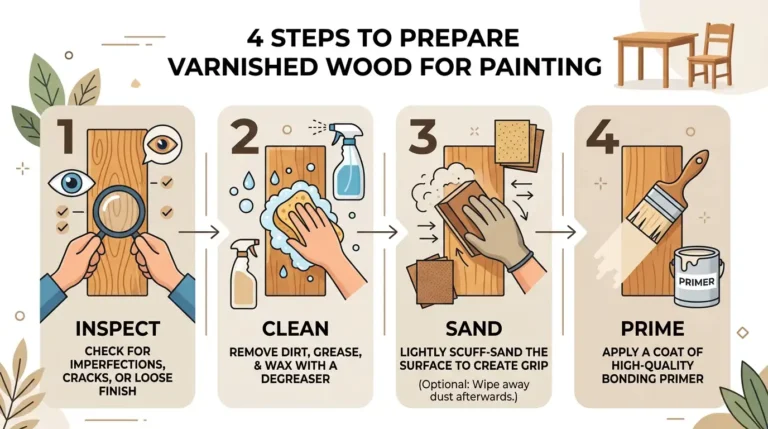
This is the step that decides whether your paint job lasts two years or two months. Skip it or rush it, and no amount of good paint will save you.
Step 1: Clean the surface first
Varnished furniture and cabinets collect grease, dust, and grime over time, especially in kitchens. Wipe the whole surface down with warm water and a mild dish soap, or a degreaser if it’s a kitchen cabinet with cooking grease buildup. Rinse with a clean, damp cloth and let it dry fully. Paint won’t bond to a greasy surface no matter how well you sand it.
Step 2: Check for damage
Look for cracks, deep scratches, water stains, or loose joints. Fill cracks and gouges with wood filler and let it dry completely before moving to the next step. Painting over damage doesn’t hide it. It usually makes it more visible once the paint dries.
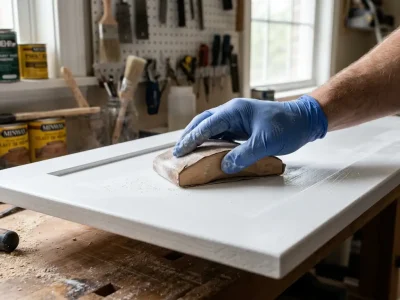
Step 3: Dull the shine (sanding or deglosser)
You have two options here, and this is where most guides only give you one.
Sanding: Use 120 to 180 grit sandpaper and scuff the entire surface until the shine is gone and it feels slightly rough to the touch. You’re not trying to remove the varnish. You’re just breaking the glossy top layer so the primer has grip. Wipe away all dust with a tack cloth or a slightly damp rag afterward. Any dust left behind will end up trapped under your paint.
Liquid deglosser: If you don’t want to sand, a liquil deglosser (sometimes called liquid sandpaper) will chemically dull the varnish for you. Wipe it on with a rag following the product instructions, let it work for the listed time, then wipe again with a clean cloth. This is a solid option for detailed trim, carved furniture, or anywhere sanding is hard to do evenly. It takes less physical effort but usually costs more per surface area than sandpaper.
Either method works. Sanding gives you more control and is cheaper. Deglosser is faster and easier on tight corners and detail work.
Step 4: Prime with the right product
This step matters more than most people realize. The primer you pick depends on the wood and the situation:
- Stain-blocking or shellac-based primer: Best for wood with tannins (oak, cherry, redwood) or any surface with old water stains. It seals the wood so tannins and stains don’t bleed through your new paint color.
- Bonding primer: Best for smooth, glossy varnished surfaces without stain issues. Built specifically to grip slick surfaces.
- Oil-based primer: Works well on most varnished wood and gives strong adhesion, but has a stronger smell and longer dry time.
Apply one even coat with a brush or roller and let it dry fully, usually one to two hours, before you touch it again. Don’t skip primer to save time. It’s the layer that actually connects your paint to the wood underneath.
How Do I Paint Over Varnished Wood: Our Step-by-Step Instructions
Once your surface is cleaned, sanded or degreased, and primed, you’re ready to paint. Here’s the process we follow on real furniture and cabinet jobs.
- Pick your paint type. Acrylic or latex paint dries fast, has low odor, and cleans up with water. Oil-based paint dries harder and holds up better on high-touch surfaces like cabinets, but takes longer to dry and smells stronger while working.
- Choose satin or flat over glossy. Glossy paint shows every brush mark, sanding scratch, and surface flaw. Satin or flat finishes hide small imperfections and still clean easily, which matters for furniture and cabinets that get touched a lot.
- Stir the paint well before you start so the color and texture are even throughout the can.
- Apply a thin first coat. Thick coats take longer to dry and are more likely to drip, sag, or crack later. Thin and even beats thick and rushed every time.
- Let it dry fully between coats, following the dry time on the can. Rushing this step is one of the most common reasons paint fails on furniture.
- Lightly sand between coats with fine grit sandpaper (220 or higher) if you want an extra smooth, professional finish. This step is optional but worth it on furniture people will touch often.
- Apply a second coat. Most varnished surfaces need two coats for full, even coverage. Some darker colors covering lighter wood may need three.
That’s the whole process. It’s not complicated, but every step matters. Skip the sanding and your paint peels. Skip the primer and your color patches or your stains bleed through. Rush the drying time and your finish cracks.
Painting Over Varnished Wood Without Sanding
Many homeowners search for painting over varnished wood without sanding because they want to save time.
The honest answer is that it depends on the condition of the surface.
You can sometimes skip sanding if:
- The varnish is smooth and firmly attached.
- There is no peeling or cracking.
- The surface has been cleaned thoroughly.
- You use a quality liquid deglosser.
- You apply a high-adhesion bonding primer.
A liquid deglosser, sometimes called liquid sandpaper, softens the glossy finish enough for primer to grip.
This method works well for lightly used furniture, trim, and decorative pieces.
It is less reliable for surfaces that receive heavy daily use, such as:
- Kitchen cabinets
- Bathroom cabinets
- Dining tables
- Stair railings
- Entry doors
For these projects, light scuff sanding still provides the strongest bond.
Spending an extra fifteen minutes sanding can add years to the life of your paint.
Choosing the Best Paint for Varnished Wood
Not every paint performs the same on previously finished wood.
Choosing the right product makes the finish stronger and easier to clean.
Acrylic Latex Paint
This is the best choice for most indoor projects.
Benefits include:
- Low odor
- Fast drying
- Easy cleanup
- Flexible finish
- Available in many colors
It works well for furniture, trim, shelving, and many cabinets when paired with a bonding primer.
Cabinet or Trim Enamel
For kitchen cabinets, bathroom vanities, and trim, cabinet enamel is often the better option.
It dries harder than standard wall paint and resists:
- Scratches
- Moisture
- Everyday cleaning
- Fingerprints
Oil-Based Paint
Oil-based paint still creates a durable finish, but it has become less common because it:
- Dries slowly
- Has a stronger smell
- Requires solvent cleanup
Many modern water-based cabinet enamels now provide similar durability with easier application.
Common Mistakes That Cause Paint to Peel
Most paint failures happen because of poor preparation rather than poor paint.
Avoid these common mistakes.
Skipping the Cleaning Step
Even clean-looking wood often has grease, wax, or furniture polish on the surface.
Paint cannot bond properly until those residues are removed.
Using the Wrong Primer
Standard drywall primers are not made for glossy wood finishes.
Always choose a bonding primer designed for sealed surfaces.
Applying Thick Coats
Heavy coats take longer to cure.
They are also more likely to sag, crack, or chip later.
Several thin coats always produce better results.
Painting Over Damaged Varnish
Loose varnish continues lifting even after it has been painted.
Repair damaged areas before applying primer.
Rushing the Drying Time
Every layer needs enough time to dry before the next one is applied.
Trying to finish the project too quickly often leads to peeling, soft paint, and poor durability.
Following these simple steps will help your paint over varnished wood project last for many years instead of needing repairs after only a few months.
Tips for a Better Wood Varnish Finish
A few things we’ve learned matter more than people expect:
- Work in a well-ventilated room. This speeds drying and keeps fumes from oil-based products from building up.
- Keep the room between 65 and 75 degrees Fahrenheit while painting. Paint dries unevenly in rooms that are too cold or too humid.
- Don’t paint over wax. If the varnished piece has ever been waxed or polished, clean it with mineral spirits first. Wax repels paint completely, and no amount of sanding fixes that if wax residue is still there.
- Test your primer and paint on a hidden spot first, like the back of a cabinet door or the underside of a table. This catches tannin bleed or adhesion problems before they show up somewhere visible.
- Use a foam roller for cabinets and flat furniture surfaces. It leaves fewer texture marks than a standard nap roller.
- Seal high-use furniture with a clear topcoat once your paint is fully cured, especially tabletops and cabinet doors that get opened and closed daily.
Let San Diego Custom Painting Handle It For You
Painting over varnished wood the right way takes patience, the right products for your specific wood and situation, and time most homeowners don’t have to spare. If you’d rather skip the sanding dust and guesswork, San Diego Custom Painting handles furniture, cabinets, trim, and full interior repaints across the area.
We also offer cabinet painting services in San Diego for homeowners who want a full kitchen or bathroom cabinet refresh without doing the prep work themselves. Get in touch for a free estimate and we’ll tell you exactly what your project needs before any work starts.
Final Verdict
You can paint over varnished wood without stripping it down to bare wood first. Clean it, dull the shine with sandpaper or deglosser, prime it with the right product for your wood type, then paint in thin, even coats. Skip any one of those steps and you’re gambling on how long the paint actually holds. Follow them in order and your painted furniture, cabinets, or trim should hold up for years, not months.
FAQs About Painting Over Varnished Wood
What happens if I paint over varnish without primer?
The paint may look fine at first but usually peels, chips, or scratches off within weeks or months. Primer is what actually bonds the paint layer to the slick varnished surface underneath.
Can you paint over varnished wood without sanding at all?
Yes, if you use a liquid deglosser instead. It chemically dulls the varnish so you can skip sanding entirely. It costs a bit more but saves time and works well on detailed or carved furniture.
What’s the best primer for varnished wood?
A bonding primer works well for most varnished surfaces. If the wood has tannins, like oak or cherry, use a stain-blocking or shellac-based primer instead so the color doesn’t bleed through your paint.
How long does paint last on varnished furniture?
With proper prep, sanding or deglossing, correct primer, and thin even coats, painted furniture typically holds up for several years of normal use before it needs a touch-up.
Do I need to strip the varnish completely before painting?
No. Full stripping is only necessary if the varnish is peeling, bubbling, or badly damaged. In most cases, dulling the surface and priming is enough.
Can you paint directly over polyurethane the same way?
Yes, the same process applies. Polyurethane is also a glossy sealed finish, so it needs the same sanding or deglossing and priming steps as varnish before you paint.