Applying a fresh layer of color is the fastest way to transform a room, a piece of furniture, or dated cabinets. However, the exact steps between opening the can and admiring the final look often cause confusion. One critical question that separates DIY results from a flawless look is whether should you sand between coats of paint.
Sanding between coats of paint is not always required for every project, but it is the secret to a smooth professional finish on cabinets, trim, and high-gloss surfaces. For standard drywall painted with a flat, eggshell, or satin finish, you can usually skip this step entirely. However, when working on woodwork, doors, or glossy layers, taking a few minutes to scuff sand ensures your paint bonds tightly and looks perfectly flat.
Table of Contents
ToggleQuick Answer: Should You Sand Between Coats of Paint?
Sanding between coats of paint is recommended on glossy surfaces, cabinets, trim, furniture, and doors, but it’s usually optional on flat or eggshell walls and ceilings. Light sanding with fine-grit sandpaper removes brush strokes, dust nibs, and small drips, which helps the next coat bond and lie smooth. If your surface already feels smooth to the touch after drying, you can skip sanding and move straight to the next coat.
Why You Should Sand Between Coats Of Paint
Paint adhesion is the technical process of a wet liquid binding to a solid surface. Most modern coatings require a microscopic profile, often called a mechanical bond or “tooth,” to hold onto the previous layer securely. Without this profile, a new layer can slide over a slick surface, resulting in peeling or chipping paint months down the road.
Beyond helping layers stick together, a gentle rubdown removes common physical flaws that ruin the appearance of your hard work. As liquid dries, it pulls tight over any tiny particles trapped in the film. Passing a fine abrasive over the surface knocks down these raised spots so they do not telegraph through to your final topcoat.
- Eliminating Dust Nibs: Air currents constantly carry tiny airborne particles that settle into wet liquid, drying into hard, gritty bumps.
- Flattening Brush Strokes: Brushes can leave raised ridges or brush marks that grow more obvious with every added layer.
- Smoothing Roller Stipple: Thick roller naps can create a heavy, orange-peel texture or leave behind loose roller marks and fuzzies.
- Fixing Drips and Sags: Vertical surfaces like doors and cabinet frames are prone to runs, paint drips, and sags as gravity pulls the wet paint downward.
- Popping Air Bubbles: Vigorous shaking or mixing can introduce air bubbles in paint, which leave tiny, sharp craters when they pop.
When You Should Sand Between Coats of Paint
Not every project needs the same treatment. Here’s when sanding between coats of paint earns its place in your process.
You’re using high-gloss or semi-gloss paint. These finishes show every flaw under light, so a light sand between layers keeps the surface even.
You’re painting cabinets, trim, baseboards, or furniture. These surfaces get touched and bumped often, so adhesion matters more here than almost anywhere else in your home.
You’re painting glossy or previously painted surfaces. Old paint, varnish, and even sealed wood are too smooth for new paint to bite into without a quick scuff.
You’re applying polyurethane over stain or raw wood. Each coat of poly should get a light sand so the layers bond and the surface stays clear and smooth.
You used a cheaper paint or noticed brush marks after the first coat. Budget paints often lack the additives that help paint self-level, so brush marks and roller texture are more common.
You’re painting exterior trim, siding, or doors. Exterior paint deals with sun, rain, and temperature swings, so good adhesion between coats helps the finish hold up outside.
When You Don't Need to Sand Between Paint Coats
You can usually skip sanding in these situations:
Interior walls and ceilings with flat or eggshell paint. Flat finishes hide small imperfections well, and most wall paint already has good self-leveling properties.
The dried coat already feels smooth. Run your hand over it. If you don’t feel ridges, bumps, or grit, there’s nothing to fix.
You’re using a quality paint with strong self-leveling. Premium paints often dry smooth enough on their own that sanding adds little value.
Surface or Paint Type | Sand Between Coats? |
Flat or eggshell walls | Usually not necessary |
Satin or semi-gloss walls | Spot sand only if needed |
High-gloss paint | Yes |
Kitchen or bath cabinets | Yes |
Trim, baseboards, doors | Yes |
Furniture | Yes |
Polyurethane coats | Yes |
Exterior siding and trim | Yes |
How to Sand Between Paint Coats (Step by Step)
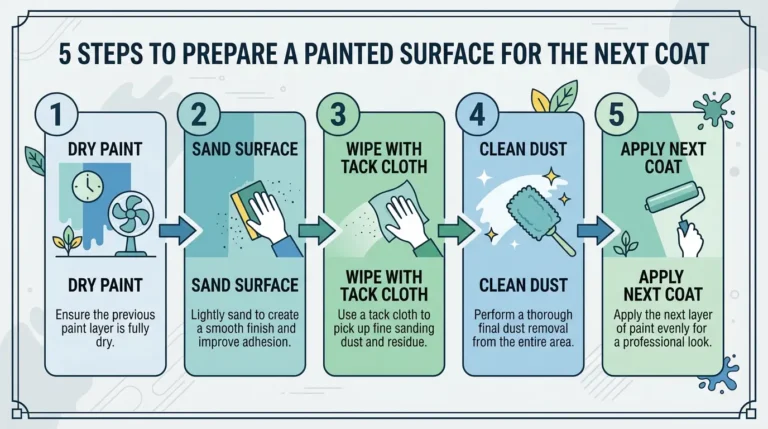
Here’s the full process, from prep to the final coat.
1. Let the paint dry fully first
This is where most people go wrong. There’s a real difference between paint drying time and curing time. A coat may feel dry to the touch in a few hours, but it usually needs a full 24-hour dry time before it’s firm enough to sand without gumming up. Sanding too early, before the paint cures, leaves a gummy paint residue that clogs sandpaper and smears instead of sanding clean.
2. Pick the right sandpaper grit
This is where a sandpaper grit chart helps:
- 220 to 320 grit (fine): standard choice for sanding between coats of paint and sanding primer
- 180 to 220 grit: good for trim and baseboards that need a bit more texture for grip
- 100 to 220 grit (medium): used to dull glossy or varnished surfaces before repainting
- 80 to 100 grit (coarse): only for stripping thick, peeling, or heavily textured paint, never for routine sanding between coats
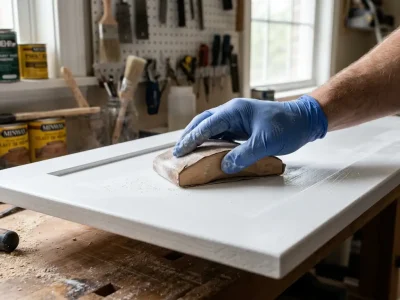
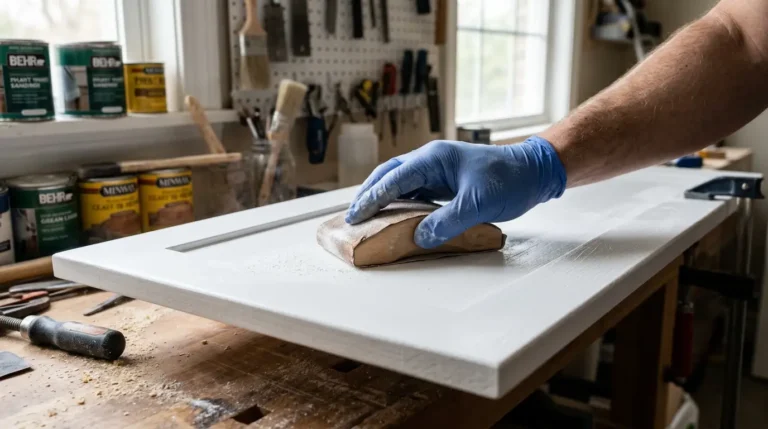
3. Sand lightly, in the direction of the wood grain
You’re not trying to remove the paint, only the texture sitting on top of it. A hand sander or sanding block gives you better control on flat surfaces. A sanding pole works well for walls and ceilings, and a sanding sponge is useful on curved trim or molding.
4. Decide between hand sanding and power tools
An orbital sander saves time on large flat surfaces like doors or tabletops, but it removes material faster, so light pressure matters. Hand sanding gives you more control on corners, edges, and detailed trim where it’s easy to sand through a thin paint layer.
5. Consider wet sanding for a finer finish
Wet sanding, using fine sandpaper with a little water, cuts down on dust and gives an even smoother result on high-gloss cabinets or furniture. It’s a step many guides skip, but it’s worth using on showpiece furniture or glossy cabinet doors.
6. Remove the dust completely
Dust removal after sanding is not optional. Wipe the surface with a tack cloth to lift fine dust, then follow with a slightly damp cloth if needed. Skipping this step traps dust under your next coat and leaves a gritty texture you’ll feel for years.
7. Apply the next coat
Once the surface is clean and dry, apply your next coat the same way you applied the last one.
This same sequence applies whether you’re working with primer or paint. If you’re wondering whether you sand after priming, the answer is yes, for the same reasons: sanding primer smooths out brush marks and gives the topcoat something to grip.
Sanding for Specific Surfaces
- Cabinets and furniture: Use fine to medium grit depending on the existing finish. Glossy cabinets need more scuffing than flat-painted furniture.
- Doors, including wood and fiberglass: Sand lightly between each coat, paying close attention to panel edges where paint tends to build up.
- Brick and mortar: These surfaces are porous and uneven, so a light sand between coats helps smooth out drips before they dry rough.
- Drywall walls and ceilings: Spot sand only where you see drips, bubbles, or patch marks. Full sanding is rarely needed here.
Common Mistakes to Avoid
Sanding before the paint is fully cured. This causes premature sanding marks, gumming, and an uneven surface.
Using the wrong grit. Too coarse, and you’ll create scratches that show through the final coat. Too fine, and you won’t create enough grip for adhesion.
Skipping dust removal. Leftover dust causes a rough, gritty texture and weak adhesion issues in the next coat.
Sanding too hard or too long. The goal is a light scuff, not removing the paint film. Over-sanding lowers paint film hardness and can expose bare wood or old layers underneath.
Skipping safety gear. Sanding paint, especially old paint, creates fine particles you don’t want to breathe in. Wear an N95 or P2 respirator and safety glasses, and work in a space with good ventilation, especially when sanding indoors or working with oil-based paint.
Achieve a Flawless Finish Every Time With San Diego Custom Painting
Getting a smooth, professional finish takes patience, the right grit, and a process that doesn’t skip steps. If that sounds like more time than you have, or you’d rather leave the sanding, priming, and clean coats to someone who does this daily, San Diego Custom Painting can handle it for you. Our team offers full interior & exterior painting services in San Diego, covering everything from cabinets and trim to whole-home exterior repaints, with the prep work and sanding done right the first time. Reach out for a free quote and get a finish that holds up, not just one that looks good on day one.
Summary
So, should you sand between coats of paint? Sand when you’re working with gloss paint, cabinets, trim, doors, furniture, polyurethane, or exterior surfaces. Skip it on flat or eggshell walls that already feel smooth. Always let paint dry the full recommended time before sanding, use fine-grit sandpaper for most jobs, and clean off all dust before adding your next coat. Get this right, and your paint job will look smoother and last longer.
FAQs About Sanding Between Coats of Paint
Do you have to sand between every coat of paint?
No. Sand between coats on glossy paint, cabinets, trim, and furniture. Flat or eggshell walls usually don’t need it unless you see visible flaws.
How long should you wait to sand between paint coats?
Wait at least 24 hours in most cases. Paint can feel dry to the touch sooner, but it needs that full window to cure enough to sand cleanly.
What grit sandpaper should you use between coats?
Use 220 to 320 grit fine sandpaper for most projects. Save coarser grits for stripping old, thick, or peeling paint.
Do you sand after priming?
Yes. A light sand with fine-grit paper smooths out brush marks in the primer and helps the topcoat stick better.
Can you skip sanding and still get a smooth finish?
On flat-finish walls with a quality paint, yes. On glossy surfaces, cabinets, or furniture, skipping sanding usually leaves visible texture and weaker adhesion.