Getting a smooth, professional paint finish on your wooden furniture or trim can feel tough. Many people struggle with peeling paint or ugly brush marks after spending hours working. This guide shows you exactly how to prepare wood for painting so your hard work lasts for years.
You want your finished project to look smooth and beautiful. Doing the correct prep work prevents the paint from bubbling or chipping off later. This article covers the exact steps, tools, and professional secrets you need to get perfect results.
Table of Contents
ToggleQuick Answer
To prepare wood for paint:
- Inspect the wood for damage, rot, or old finishes.
- Clean the surface to remove dirt, grease, and dust.
- Sand the wood using the correct grit sequence.
- Fill cracks, holes, and dents.
- Remove all sanding dust.
- Apply the right primer.
- Lightly sand the primer if needed.
- Start painting after the primer fully dries.
Skipping any of these steps can lead to peeling paint, paint bubbling, uneven coverage, and a shorter paint life.
Understanding Your Wood First
Not all wood behaves the same way under paint.
- Hardwood like oak and maple is dense with a tight grain, so it needs less sanding.
- Softwood like pine and cedar is softer and can dent or soak up paint unevenly.
- New, bare wood is smooth but often has resin or sap that needs sanding away first.
- Old wood may have layers of paint, cracks, or splinters that need fixing before you start.
- Treated wood, the kind used outdoors, needs a thorough clean before paint will grip it.
- Wood with high moisture content won’t hold paint well, so let it dry out completely first.
Knowing what you’re working with helps you pick the right grit, the right cleaner, and the right primer for the job.
Tools and Materials You'll Need
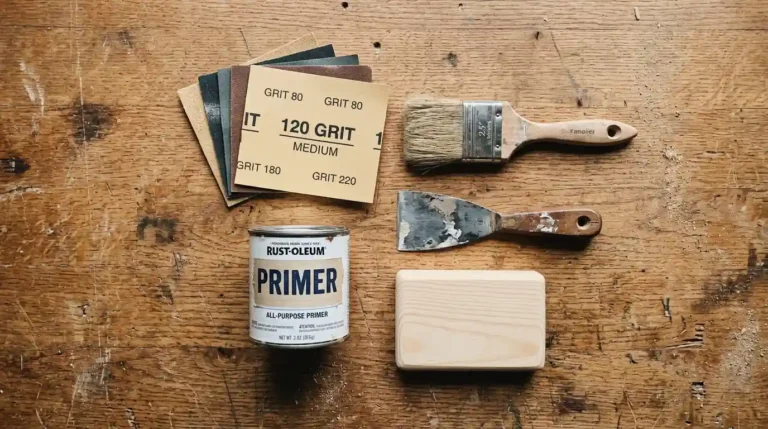
Gather these before you begin so you’re not running to the store halfway through:
- Sandpaper in a few grits
- A degreaser, or mild soap and water, for cleaning
- Trisodium phosphate (TSP) for greasy or glossy surfaces
- Wood filler or wood putty for cracks and holes (spackle works for tiny nail holes)
- A putty knife
- Tack cloth to lift dust after sanding
- A primer suited to your project (oil-based, water-based, or bonding)
- Gloves, a dust mask, and safety glasses
If you’re working with an older piece that has flaking paint, add a paint scraper and a wire brush to your list too.
Step-by-Step: How to Prepare Wood for Painting
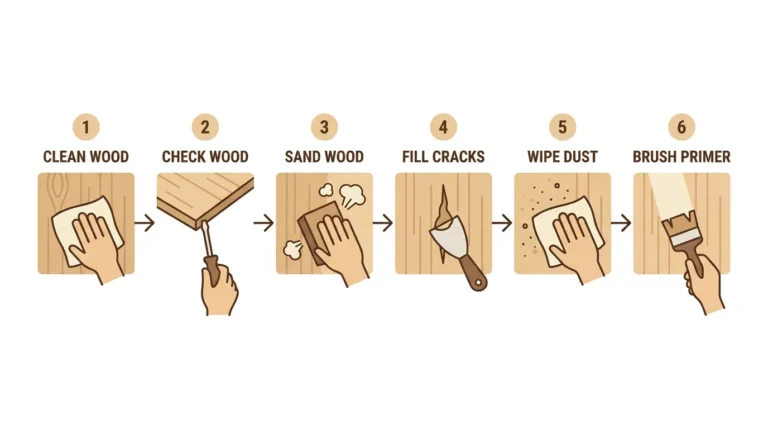
This is the part that decides whether your paint job lasts five years or five months.
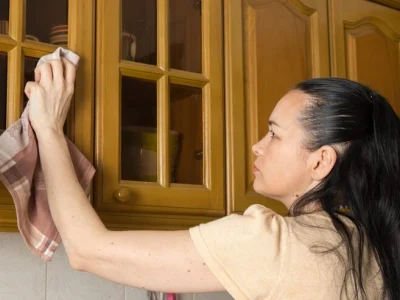
1. Clean the Wood First
Dirt, grease, and dust stop paint from sticking. Wipe the surface down with a degreaser or warm water and mild soap, then let it dry fully. Oiled or waxed wood needs a stronger pass with TSP or a vinegar and water mix, since leftover residue blocks both primer and paint.
2. Check for Damage
Press a screwdriver gently into any spot that looks soft. If it sinks in, that’s rot, and the damaged section needs to be cut out or replaced before you paint over it. Water-damaged wood should never just be painted over since it hides the problem instead of fixing it.
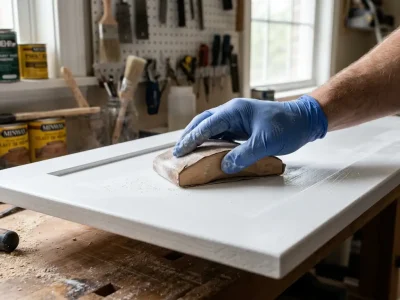
3. Sand the Wood
Sanding wood before painting gives the primer something to grip. Move from a coarser grit to a finer one as the surface smooths out:
Grit | Best For |
100-150 | Removing old paint, rough or weathered spots |
180-220 | General smoothing on bare wood |
220-320 | Final pass before priming |
320-400 | Light sanding between coats |
Sand with the grain, not against it. Going against the grain leaves scratches that show through paint. A dust-free sanding tool or a shop vacuum keeps the air cleaner while you work.
4. Fill Cracks and Holes
Apply wood filler or putty with a putty knife and let it dry fully. For outdoor pieces, an epoxy wood filler holds up better against moisture than standard filler. Once dry, sand the patched spot flat with fine grit paper.
5. Wipe Away the Dust
Run a tack cloth over the whole piece. Leftover dust turns into a rough, gritty texture once you paint, so don’t skip this step.
6. Prime the Wood
Priming wood for painting is not optional if you want even color and lasting grip. Primer is the biggest factor in paint adhesion, since it seals the wood and blocks stains from bleeding through. Use a water-based primer for most indoor projects, an oil-based primer on stains and knots, and a bonding primer on slick or glossy surfaces. Let it dry, then sand lightly with 320-400 grit before your first coat.
Choosing the Best Paint for Wood
The best paint for wood depends on where the piece lives and how much wear it takes.
- Latex (water-based) paint dries fast and works well for indoor furniture and trim.
- Oil-based paint holds up better against scratches, a solid pick for doors and cabinets.
- A water-based urethane enamel gives you oil-paint toughness with less smell.
- Low-VOC paint is worth choosing if you’re painting indoors and want a milder smell.
Apply two to three thin coats instead of one thick one. Thin coats dry even and don’t pool in corners or edges.
Common Mistakes to Avoid
- Skipping sanding because the wood “looks smooth enough.”
- Painting over dust, grease, or wood that’s still damp.
- Rushing the dry time between coats.
- Using the wrong filler for an outdoor piece, where moisture will break it down fast.
- Forgetting gloves and a dust mask when sanding or using a chemical stripper.
Each of these leads to the same outcome: peeling paint, bubbling, or a rough finish you’ll end up redoing.
Special Cases: Painted, Varnished, or Damaged Wood
Preparing painted wood for painting again is common with older furniture and trim. If the old coat is solid, clean it, sand it lightly, and prime over it. If it’s flaking, scrape the loose pieces off first.
If the piece was painted before 1978, test for lead paint before sanding or scraping. Lead dust is harmful to breathe, so use a lead test kit and follow proper safety steps if it tests positive.
Varnished or lacquered wood is slick, so paint won’t grip without help. Strip the finish with a chemical stripper or gel stripper, or use a heat gun to lift old layers, moving it constantly so you don’t scorch the wood. Work in a space with fresh air moving through, and wear gloves and eye protection.
Stains or watermarks can be lightened with wood bleach before you sand and prime. For open-grain wood like oak, a grain filler gives you a smoother base coat.
Painting kitchen cabinets takes more prep than almost any other wood project in the home, since grease builds up on every surface over time. If you’re in the San Diego area and would rather skip the multi-day prep work, San Diego Custom Painting offers cabinet painting services in San Diego that cover every step above and are built to last. Reach out for a free quote and get cabinets that look brand new without the weekend of sanding.
Advanced Tips for a Better Finish
- Test your paint on a hidden spot first to check color and grip.
- Sand lightly between every coat with 320-400 grit paper.
- Keep the room between 65 and 85°F. Cold or damp air slows drying and can leave paint looking cloudy.
- Use a good brush or roller. Cheap ones leave bristle marks and lint behind.
How Long Does Wood Prep Take?
Plan for one to two days on a small project, like a chair or side table. Larger pieces, cabinets, or wood with old paint can take three to five days once you count dry time for filler, primer, and each coat. Rushing any of these steps is the top reason paint jobs fail early.
Final Thoughts
A good paint job starts long before the paint can open. Clean wood, careful sanding, and a solid coat of primer turn rough lumber into paint-ready wood that holds color for years instead of months. Take your time with each step, and your piece will look like it came from a shop, not a rushed weekend job.
FAQs About Wood Preparation
Do I need to prime wood before painting?
Yes. Primer helps paint sticks, blocks stains, and gives you even color. Skipping it often leads to peeling within months.
How do I prime wood for painting the right way?
Clean and sand the wood first. Apply a thin, even coat with a brush or roller, let it dry fully, then sand lightly before your first coat of paint.
Can I paint over wood without sanding it?
A bonding primer can work on smooth surfaces, but sanding wood before painting still gives the best grip and the longest result.
What’s the best paint for wood furniture?
Latex paint works well for most indoor furniture. Oil-based paint holds up better on cabinets, doors, and pieces that get heavy use.
How long should I wait between coats?
Most paints need two to four hours of dry time between coats. Check the can for exact timing, since it changes by brand and humidity.