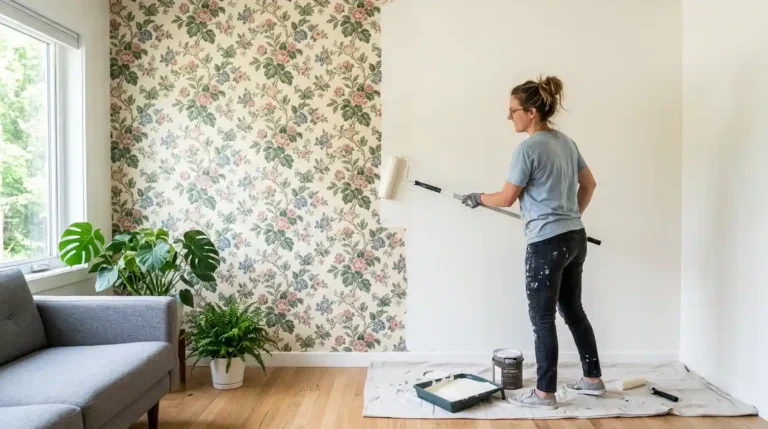
You’re staring at that dated floral wallpaper wondering if you really have to strip it before you paint.
Good news: yes, you can paint over wallpaper in most cases, and skipping removal can save you a full weekend of scraping and swearing. But it only works if you know which walls are safe candidates and which ones will bite you later. Below, I’ll walk through exactly how to tell the difference, the primer that actually matters, and the mistakes that turn a shortcut into a redo.
Table of Contents
ToggleQuick Answer: Can You Paint Over Wallpaper?
Yes, painting over wallpaper is possible, and it’s a common shortcut homeowners use to skip a messy strip-and-scrape job. It works well when the wallpaper is fully bonded to the wall, has flat or lightly textured seams, and gets prepped with the right primer. It does not work on peeling paper, vinyl-coated paper in damp rooms, or paper with heavy texture you’re trying to hide.
Painting on top of wallpaper isn’t a hack. It’s a legitimate prep method, as long as you treat the wallpaper like a surface that needs sealing, not like bare drywall.
When It's Ok to Paint Over Wallpaper (And When It's Not)
Before you open a paint can, walk your walls and check for these things. This decision matters more than the paint you pick.
Good candidates for painting over wallpaper:
- Paper is glued down tight at every edge and seam, no lifting corners
- Surface is flat or has only light texture, like grasscloth-style vinyl
- No visible water stains, bubbling, or mold smell
- Walls are in a low-humidity room (bedroom, living room, hallway)
- Only one layer of wallpaper, not two or three stacked
Skip painting and strip it instead when you see:
- Peeling seams or bubbled sections anywhere on the wall
- Heavy embossed or grasscloth texture you actually want gone
- Wallpaper in a bathroom, laundry room, or kitchen with steady steam exposure
- Torn spots showing bare drywall or old plaster underneath
- Multiple layers of wallpaper stacked from past renovations
If your walls fall into that second list, painting over wallpaper isn’t a shortcut. It’s a way to lock in a problem under a fresh coat of paint, and it will show up again in six months.
Why Wallpaper Seams Show Through Paint (And How to Stop It)
This is the number one complaint I hear from homeowners who tried this themselves. They paint, it looks fine for a day, then every seam line “ghosts” through the paint under a certain light. Here’s why: paint doesn’t fill gaps. It’s not a filler, it’s a coating. If the seam has even a hairline gap or a raised edge, paint just drapes over it and highlights the ridge.
The fix is simple but easy to skip. Run your hand over every seam before you prime. If you feel a ridge, skim it with a thin layer of joint compound, let it dry, then sand it flush. Do this before the primer goes on, not after.
The Right Way to Paint Over Wallpaper: Step by Step
- Clean the walls. Wipe down with a mix of water and TSP cleaner to remove dust, grease, and grime. Wallpaper holds onto both more than bare drywall does.
- Repair loose seams and edges. Use wallpaper seam adhesive on any lifting corners. Press flat and let it cure fully, usually 24 hours.
- Skim and sand rough spots. Joint compound over seams and texture, sanded smooth once dry.
- Prime with an oil-based or shellac-based primer. This step is non-negotiable. Skip ahead to the primer section below.
- Let the primer cure fully. Rushing this step is the most common reason paint fails to bond.
- Paint in two thin coats. Thin, even coats beat one thick coat every time. Thick coats trap moisture and can reactivate old wallpaper glue.
Primer Over Wallpaper: The Step Most People Skip
If you remember one thing from this article, make it this: primer over wallpaper is not optional. Regular latex paint alone won’t seal the paper fibers, and it can actually reactivate old wallpaper adhesive, causing bubbles days after you thought the job was done.
Oil-Based Primer for Painting Over Wallpaper
An oil-based primer for painting over wallpaper is the standard recommendation from painting pros, and for good reason. Oil-based and shellac-based primers seal the paper surface completely, block the pattern from bleeding through light-colored topcoats, and lock down the seams so moisture from your paint can’t loosen the old glue.
Shellac-based primer dries faster and blocks stains best, but has a stronger smell and needs good ventilation. Oil-based primer is a bit slower to dry but easier to work with in larger rooms. Either beats a standard water-based primer for this job.
Comparison Table: Primer Options for Painting Over Wallpaper
Primer Type | Seals Wallpaper Pattern? | Blocks Adhesive Reactivation? | Dry Time | Best For |
Oil-based primer | Yes, fully | Yes | 6–8 hours | Most rooms, large walls |
Shellac-based primer | Yes, fully | Yes | 45 min–1 hour | Stubborn stains, dark patterns |
Water-based (latex) primer | No, pattern often bleeds through | No, can reactivate glue | 1–2 hours | Bare drywall only, not wallpaper |
Pigmented shellac primer | Yes, fully | Yes | 45 min | High-contrast pattern coverage |
Myth vs. Fact
- Myth: Any primer will work if you add enough coats.
- Fact: Extra coats of the wrong primer won’t fix the problem. Water-based primer sits on top of paper without sealing it, no matter how many coats you use. The paper still absorbs moisture and the seams still move.
- Myth: Textured wallpaper always needs to be removed.
- Fact: Light texture like grasscloth can be painted over successfully. Heavy embossed texture usually needs a skim coat first, or removal, if you want a smooth modern look.
What 26+ Years of Painting Walls Has Taught Me
I’ve walked into more than a few homes where a homeowner painted straight over wallpaper with a cheap latex primer, and within a month the seams bubbled and the pattern started ghosting through a light gray topcoat. The fix cost more than stripping the paper would have in the first place.
The jobs that hold up long-term always have three things in common: a full seam repair before primer, an oil-based or shellac primer applied in one solid coat, and enough dry time before topcoat, even when the homeowner is in a hurry. Skipping any one of those three is where almost every failure starts.
Is It Ok to Paint Over Wallpaper in a Bathroom or Kitchen?
Short answer: usually not. Rooms with regular steam and humidity swings put constant stress on the wallpaper glue underneath. Even a great primer job can start lifting at the seams within a year or two in a shower-adjacent bathroom. For kitchens and bathrooms, stripping the wallpaper down to bare drywall or plaster gives you a paint job that actually lasts.
Paint Over Wallpaper or Remove: How to Decide in 60 Seconds
Ask yourself these three questions:
- Is the wallpaper fully bonded with no peeling anywhere? If not, remove it.
- Is the room low humidity, like a bedroom or living room? If not, remove it.
- Do you want a completely smooth, texture-free wall? If yes, remove it.
If you answered yes, yes, and no, painting over wallpaper is a reasonable move. If any answer flips, plan on stripping the paper first. It’s more work upfront, but it’s the difference between a paint job that lasts one year and one that lasts ten.
Conclusion
Painting over wallpaper works when the paper is tightly bonded, the room stays dry, and you commit to real prep: seam repair, a skim coat where needed, and an oil-based or shellac primer applied correctly. Skip any of those steps and you’re just delaying a bigger job. As more homeowners tackle renovations themselves, expect primer technology to keep closing the gap between “painted over” and “fully replaced” walls, but the fundamentals here will hold for years to come.
If your walls have peeling seams, heavy texture, or you’re just not sure which category your wallpaper falls into, it’s worth getting a second opinion before you commit a weekend to it.
SD Custom Painting walks through this exact decision with homeowners across San Diego every week, and our crews handle everything from seam repair to final topcoat. If you’d rather hand the whole project to a pro, our interior painting services in San Diego cover wallpaper assessment, prep, and painting from start to finish. Reach out for a walkthrough before you buy a single can of primer.
Frequently Asked Questions
Can you paint over wallpaper without priming first?
No. Skipping primer is the top reason painted wallpaper fails. Paint alone won’t seal the paper fibers or stop old adhesive from reacting to moisture, leading to bubbles and peeling within weeks.
What happens if you paint over peeling wallpaper?
The peeling gets worse. Paint adds weight and moisture to loose seams, which accelerates lifting. Repair or remove peeling sections before you paint, never paint directly over them.
Do you need oil-based primer for painting over wallpaper, or will water-based work?
Oil-based or shellac-based primer is strongly recommended. Water-based primer doesn’t seal paper fibers well and can reactivate old wallpaper glue, causing bubbles later.
How long should primer dry before painting over wallpaper?
Oil-based primer needs about 6 to 8 hours minimum, ideally overnight. Shellac-based primer dries faster, around 45 minutes to an hour, but check the can since brands vary.
Can you paint on top of wallpaper with textured patterns?
Light texture, like grasscloth, can be painted over after priming. Heavy embossed texture usually needs a skim coat of joint compound first to avoid a bumpy, uneven finish.
Is it cheaper to paint over wallpaper than to remove it?
Usually yes, in materials and time, if the wallpaper is a good candidate. But if it fails prep and needs a redo, removal would have been cheaper from the start.